Note: Someone claimed that because we recommended it, they signed up for a ZOHO email account, and therefore we are responsible for them for life and must resolve all their issues for free. We refuse to be held morally accountable! For email-related issues, please contact ZOHO’s customer service or switch to a different email provider. We are simply sharing information for the sake of discussion and do not profit from this in any way.
Note: Please be aware that ZOHO email accounts cannot be used to send cold emails. If the system detects this, it will automatically suspend your ability to send emails; however, it’s easy to have the suspension lifted. ZOHO email accounts are best used for business communication, as they offer high delivery rates and are affordable. For cold emails, we recommend using Zoho Campaigns.
不建议拿业务邮箱发开发信,现在全世界企业邮箱都在抵制垃圾邮件,被发现会限制发件功能。如果订单聊到下单阶段,邮箱无法对外发送邮件,可能损失巨大。
服务器商家免费赠送的企业邮箱不建议使用,发信容易被拦截,安全性不高,也会拖慢网站速度。服务器到期邮箱无法使用,搬迁邮箱/邮件也麻烦。
The vast majority of international trade orders are secured through email communication. For companies engaged in international trade, email is indispensable; in addition to sending outreach emails to contact clients, it can also be used to promote the company’s website and corporate image.
The image below is a screenshot of a GoDaddy business email advertisement, which highlights that a business email address conveys professionalism. We do not recommend using Gmail as your primary email address for communicating with clients.

In the article “Free Tencent Enterprise Email Registration Guide,” we compared the pros and cons of several email services. Among them, the ZOHO International Edition offered the best value for money and the highest email delivery rate. Sam’s company at MiKe Liao Shen also uses ZOHO Enterprise Email.

Because domestic foreign trade enterprises send development letters wildly, resulting in a lot of domestic mailboxes IP by foreign black interception, so domestic mailboxes (including paid mailboxes) to send letters to foreign customers will not be very high arrival rate. Especially QQ mailbox is not so good in international reputation, it will be prompted as spam by Gmail, Outlook and so on.
US ZOHO enterprise mailbox is one of the best choices with good effect and high cost performance. The cost is charged according to the number of mailboxes opened, one mailbox 12 dollars a year. Google enterprise mailbox is as low as 72 dollars a year/one mailbox, only the tycoon can afford it.
Note: ZOHO Mail is available in an international version (www.zoho.com/mail/) and a mainland China version (www.zoho.com.cn). If you’re involved in international trade, you must register for the international version. Xiao Di called ZOHO customer service and learned that the Mainland China version of ZOHO Mail is primarily used for communication between domestic businesses, and its delivery rate for international emails is not as good as that of the International version.
If the domain has already been registered for another brand's business email service and you want to switch to ZOHO Business Email, simply follow the steps below to re-register it. When adding domain records such as MX records, you must first delete all records associated with the previous email service before adding ZOHO's records.
When you open a mailbox account, you can set the mailbox to be the same as the previous mailbox, so that old customers can receive emails smoothly when they send emails. You can also register different mailbox accounts and then add mailbox alias, set the alias to be the same as the previous mailbox, so that you can also receive emails from the previous mailbox.
ZOHO Mailbox Registration Tutorial
You’ll need to open a VPN first to avoid lag and to prevent having to register for a domestic ZOHO email account. You’ll also need to have a domain name ready to set up your business email; you’ll need to add a few DNS records later. First, log in to your domain management interface (where you registered the domain).
If you don't have a domain name yet, follow the tutorial to register one 👉《Latest Namesilo Domain Name Registration TutorialThe.
Create an account
The free ZOHO Business Email does not support POP or IMAP, so you cannot use software like Foxmail on a computer (though you can use the mobile app); you can only access your email via the web version. If you’re in international trade, we do not recommend using the free version—you should be willing to make a basic investment.
Open to ZOHO mailbox official websitehttps://www.zoho.com/mail/(First, open your VPN), select “Business Email,” enter your English name (pinyin is also acceptable) and your primary email address (do not enter your phone number!), check the box to agree to the terms of service, and click “SIGN UP FOR FREE.”
As shown in the image below, we recommend registering with an email address rather than a phone number. This is because if you enable two-factor authentication (entering a verification code sent via text message) during phone registration, you’ll need to link a second phone number. Additionally, some phone numbers are set to block text messages from overseas, which prevents registration. Since there’s also a possibility that you might change your phone number in the future, it’s best to register with an email address.


The image above ↑ shows the registration screen without a VPN app. The image below ↓ shows the registration screen with a VPN app; there’s an additional address option—just pick any one.

If there is the following prompt "We are unable to create your account right now. Please contact support-as@zohocorp.com", change your email address to register, there is a customer change outlook One customer changed his outlook email address.

Enter the email verification code received (perhaps into the spam mailbox) ↓, click "VERIFY".

The default option is to pay annually for a cheaper price.

5G/User price is $1 a month, choose 10G/User price is $1.2 a month. Choose according to your needs, 5G is usually enough, click "Buy Now".

Select “Add an existing domain,” then click "Add now"↓.

Enter the website URL and company name, select your industry, and click “Add Now/Add.”

Click "Proceed to payment" to enter the payment interface.

Payment for enterprise mailbox
You need to pay first to continue to create enterprise mailboxes. Enter the number of mailbox accounts you want to open and click "Continue".  .

Confirm the order information↓, click "Confirm" if there is no problem  .

Enter the billing information.

Choose the payment method, either credit card with Visa, Master logo or Paypal, then click "Continue". .

After completing the payment, the message shown in the image below will appear. The message mentions something about $6 or a similar amount—it’s not important. Click “Go to Workplace.”  .

Add email domain
Now that you’ve completed the ZOHO account registration following the tutorial above, you need to verify your domain ownership, add the domain, and then create a business email account. Click “Complete setup now!” in the image below to begin verifying your domain.

Note: To add the following TXT record, go to your domain name resolution management dashboard and add the TXT record below.

Follow the steps in the image below to add a TXT record. Leave the TTL at its default value and do not select it. The image below shows a screenshot of adding a domain record in Cloudflare; while the interface may vary depending on your domain registrar, the process is the same. Select "TXT," enter "@" in the "Name" field, enter the text you want to resolve in the "Value" field, and click "Save."

After adding the DNS records, return to the ZOHO Mail page and click “Verify TXT Record” to verify that the records were added correctly. If verification fails, it may be because some DNS servers take a little longer to update; please wait a few minutes and try again. It’s also possible that the DNS records were added incorrectly, so please double-check them.

If the DNS records have been added correctly, you'll be taken to the screen shown below to start adding an email address. Enter the email prefix you want, then click “Create.”

After successful creation, you will enter the following screen, click "Proceed To Setup Groups →" at the bottom of the page.


Go to the "Groups" setting, "Groups" is the meaning of the mailbox group, generally not used, later add also OK. Skip, directly click "Proceed To DNS Mapping".


Priority is the weight, fill in as usual, only MX resolution needs to be filled in. If you do not know how to add, find someone else to help. We help customers to build a station will be free to help customers add domain name resolution or even free registration of enterprise mailbox.

The image below shows what it looks like after the entries have been added. The DKIM record name is a bit unusual; for the other four records, just enter “@.”

Click "Verify All Records" after adding the resolution.

If you parse correctly, you will enter the following page, "Data Migration" is the old mail relocation service, if your mailbox is opened through enterprise mailbox in other places before, use this service to relocate all old mails to ZOHO inbox. Here we skip this service and directly click "Proceed To Go Mobile" at the bottom.


Go to the IMAP, POP, and SMTP information screen shown below. This is very important—take a screenshot of the entire screen and save it. You’ll need this information to link your email account to an email client. After saving it, click “Proceed To Setup Completion” as shown below.


| Link method → | IMAP | POP | SMTP |
| Server address/name | imappro.zoho.com | poppro.zoho.com | smtppro.zoho.com |
| Port | 993 | 995 | 465(SSL) or 587(TLS) |
| SSL | Support (check SSL when binding) | ||
| Login User Name | E-mail address xxx@xxx.com | ||
| Login Password | SMTP password (if any) or email password | ||
Here ZOHO mailbox registration tutorial ends and the mailbox can be used normally. Click "Check out your inbox" to enter the web version inbox, and click "Go to Admin Console" to enter the mailbox control background.
The following is a tutorial, it is recommended to follow the tutorial to set the SMTP password for binding Foxmail and so on. Want to improve security higher recommended to open the login verification.


Adding DMARC records
The purpose of DMARC is toPreventing Email ForgeryDelivered to the recipientInbox / Create Fake EmailsFailed to impersonate, must be enabled. After logging in, go to ZOHO Mail Domain Management, click the corresponding email domain, and you will see the screen shown below.
Note: After enabling this feature using the instructions in Method 2 below, you may frequently receive report emails like the one shown below, which include attachments. This is normal. If you do not want to receive these emails, simply follow the instructions in Method 1 to add them.We recommend Method 1..

Method I:If you do not want to receive report emails, simply add the TXT record shown in the image below (you do not need to follow the steps below): Name: _dmarc Value: v=DMARC1; p=quarantine; sp=quarantine; adkim=r; aspf=r
Caution:The double quotes around the value are automatically added by the system after pasting; just ignore them and simply copy and paste the value highlighted in yellow above.

Method II:To enable DMARC, follow the steps shown in the figure below to generate the records.

Click "Manual Configuration"↓.

The following picture will be displayed, add a TXT domain name resolution to the domain name as required, and then click the "Verify" button.

The following figure shows how to add a TXT record.

A few minutes after adding the record, click the “Verify” button. The image below shows that verification was successful. If you added the DNS record in CloudFlare, it takes effect within 10 seconds, and you can click “Verify.” If you added it through another DNS provider, you may need to wait a few minutes.

Please use the secure login verification feature with caution!
In the Email Management Console, you can enable the login verification feature at the location shown in the image below. This means that when logging in, you’ll need to open your mobile verification app, view the verification code there, and enter it before you can access your email account—significantly enhancing security.
When you log in to your email account, the login screen will usually prompt you to enable or set up two-factor authentication. We recommend enabling only the “SMS-based dynamic verification code” feature shown in the image below. Entering the verification code sent via text message when logging in provides the same level of security but is more convenient.
We do not recommend enabling the three login verification features shown in the red box below. Occasionally, users report that they are unable to verify their login email address due to accidental uninstallation of the app, switching to a new phone, or similar issues.
If you enable this feature, be sure to download and save your recovery password. When logging in, you can choose to use the 12-digit recovery password; when entering the numbers, be sure to remove any spaces between them.

ZOHO Mail Tutorial
The following 3 commonly used URLs are recommended to bookmark your browser and will be used in the future.
1- General Email Console (Workplace)This is where you configure the highest-level permissions, allowing you to manage all email accounts associated with the account. For example, you can enable or disable two-factor authentication for all accounts, as well as add or remove email addresses and domains.
2- ZOHO Mail Web Version InboxYou can send, receive and view emails here.
3- Email Management Dashboard, view usage statistics for individual (personal) email accounts, set up a profile picture, enable secure login, and more.
The first time you access the web version of your inbox, a welcome window like the one shown below will pop up. Click the arrow in the red box to switch to the second page, where you can select your language.

Type english in the language and select "Chinese Simplified" from the result, you need to refresh the page after setting before it becomes Chinese.

The third page is the mailbox name and signature setting.

The fourth page is the backend interface color selection.

Click on the fifth page to go to the Inbox.

Change the default language of ZOHO mailbox
As mentioned in the tutorial above, when you log in to your email for the first time, a welcome screen will appear, and you can set your language on the second page. If you didn't select a language at that time, you can go toPersonal Information PageClick "Edit" to change the language.

Select Chinese.

Become familiar with the interface and features of the ZOHO web-based email service
Like Google Enterprise Mail, ZOHO integrates mailbox into the office suite, so there are many functions in the mailbox interface, which makes people dazzled. In fact, many functions are other functions of office suite, which are not related to mailboxes, so just ignore them.

To the left of the email inbox ↓ are the calendar, contacts, and other items—it’s self-explanatory.

You can check the capacity and expiration time of your mailbox by clicking the header image, and there are entrances to "My Account" and "Management Console".

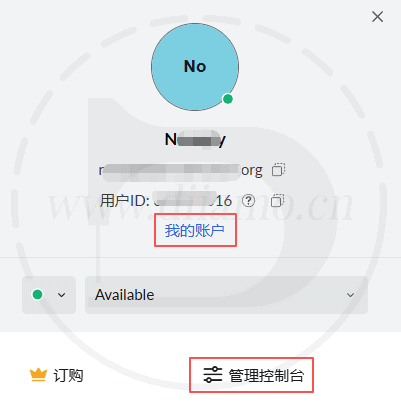
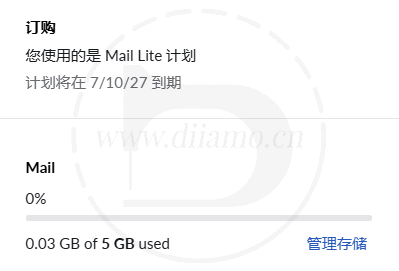
Click the gear below to enter mailbox shortcut settings, you can set mailbox signature, incoming/outgoing mail interface layout, anti-spam mailbox and so on.


How to upgrade your ZOHO free email to a paid email address
You are logged in to your email account. Click to continue.Management Back Office, click the Upgrade button in the upper right corner (below).

Select "Annual Payment", then select the mailbox capacity and click "Upgrade".
 、
Click "Continue", note: you can only upgrade the paid packages for all the mailboxes you have created, you can't upgrade a mailbox individually.

Several email accounts have already been set up, and the system displays how many plans need to be purchased. For example, as shown in the image below, there are four free business email accounts under the customer’s account, so the system automatically indicates that four paid email plans need to be purchased.


Enter the billing information.

Choose the payment method, you can choose a credit card with Visa, Master logo or Paypal, click "Pay" or "Continue".  Follow the process to complete the payment.

After completing the payment, you will be prompted with the image below. If it says $6 or something like that, ignore it, it doesn't help.

Go to Adminhttps://mailadmin.zoho.com/cpanel/home.do#dashboardIf the top right corner of the subscription plan shows "Email Lite", it means that the upgrade is completed. Click "License" to view the package details↓.


How to Renew a ZOHO Paid Email Account Early
Zoho in the U.S. generally does not support "proactively renewing in advance to extend the expiration date"—its design logic is either "automatic renewal upon expiration" or "manual payment before expiration," rather than allowing you to pay for the next billing cycle now and extend the expiration date by one year.
Enable auto-renewal (Control Panel → Billing → Check the "Auto-renew" box): This ensures that payment is automatically deducted on the expiration date, providing seamless continuity.
Do not enable auto-renewal: As the expiration date approaches (usually 30, 15, or 7 days in advance), you will receive an email reminder. Log in to the admin console → Subscription → Renew to pay manually.
How to add a new mailbox account to ZOHO mailbox?
Under a single domain, it is usually necessary to set up multiple email accounts. After logging in to your email, go toMailbox Management ConsoleGo to the user section and click "Add".

ZOHO enterprise mailboxes are charged by the number of accounts/users, one mailbox/user is $12 per year. New mailboxes need to be purchased.

Click on "Upgrade User/ Add-ons" ↓ in the middle of the page on the right.

Select the number of email accounts you want to add, then click “Continue.” Ignore the other options—don’t select them; they’re useless and a waste of money.

Confirm the order content, and click "Pay" if there is no problem.

Payment successful↓.

Re-entryMailbox Management ConsoleClick the "Add" button. Click "Add".
Enter the information as shown and click "Add".

Create mailbox/user successfully. If you want to continue to recommend new mailboxes, click "Add more users". If you want to set the content of the new mailbox, click "Go to created users". To open SMTP password for the new mailbox, see the tutorial below↓.

How to set SMTP password for ZOHO mailbox?
To link your email account to an email client such as Foxmail, you'll need to enter your email password. To enhance security, we recommend setting up an additional SMTP password specifically for logging into third-party clients.
Open and loginhttps://accounts.zoho.com/home#security/app_passwordClick on "Generate a new password".
Note: To set the SMTP password for a specific email account, log in to that account to make the changes. If you have just added a new email account, you must first log out of your current account, then log in with the new account before setting the SMTP password.

Enter an English name and click “Generate.”

The red box is SMTP password, save it. You need to input this password when linking Foxmail and other third party clients, you don't need to input mailbox password.

The following image shows that the SMTP password has been generated.

ZOHO how to mailbox binding cell phone / computer client
You need to turn on the appropriate permissions before binding. Mailbox login status, accesshttps://mail.zoho.com/zm/#settings/systemGo to the Mailbox Settings > "Mailbox Account" settings page as shown below. Click Enable POP, IMAP, SMTP.


ZOHO has its ownMobile Email Client SoftwareYou can also search for "ZOHO Mail" in the Google Play Store or the App Store to install it. If you can't access the Google Play Store on your Android phone, click here to download it.ZOHO Mail APK installation package.
On a computer, we recommend using Foxmail to send and receive emails, as it is more convenient. You can also use the official ZOHO desktop software.
Note: The domestic and international versions of the cell phone APP are common, by default the APP login interface is to log in the domestic ZOHO mailbox, and inputting the international mailbox account to log in will prompt that this account does not exist. You need to click the earth icon COM↓ in the upper right corner to switch to the international mailbox login interface.

Some versions of the software look like this ↓ in the picture below:

Cell phone can also use QQ mailbox, Netease mailbox master and other APP to bind ZOHO mailbox to realize sending and receiving, refer to the following binding Foxmail tutorial. Binding client needs to fill in SMTP and other information, check the table below.
| Link method → | IMAP | POP | SMTP |
| Server address/name | imappro.zoho.com | poppro.zoho.com | smtppro.zoho.com |
| Port | 993 | 995 | 465(SSL) or 587(TLS) |
| SSL | Support (check SSL when binding) | ||
| Login User Name | E-mail address xxx@xxx.com | ||
| Login Password | SMTP password (if any) or email password | ||
On a computer, we recommend linking your account to Foxmail—it’s used by the vast majority of people in international trade. Here are the steps to link your account:
Click the Settings button in the upper right corner of Foxmail and click "Account Management".

Click "New".

Select another mailbox.

Select "Manual Settings".

Enter the information and click Create. If you have set SMTP password in the password field, enter SMTP password, if you have not set it, enter your email password.

Add email successfully

How to Link a Website to ZOHO Mail to Enable SMTP Email Sending
Note: There appears to be a bug in version 1.6.3 of this plugin. After a successful connection, the “From Email Address” dropdown menu does not display any email addresses, preventing the binding from completing successfully. Xiao Di has already reported this bug to the developers. You can also have the AI fix the plugin directly.
If, like Xiao Di, you’re building an e-commerce website and need to link it to a ZOHO email account to send emails and automatically send notifications when you receive inquiries, you can use the official, free “Zoho Mail for WordPress” plugin.
After installing and activating the plugin, go to the plugin settings screen↓.

1- Click the blue text “Zoho OAuth Creation” shown in the image below on the plugin interface to go to the official authorization website. Log in first;

2- After logging in to the official authorized website, click “ADD CLIENT” in the upper-right corner ↓.

In the pop-up window, click “Server-based Applications” as shown below ↓.

Fill out the form as instructed ↓. In the “Authorized Redirection URLs” field at the bottom, paste the authorized URLs copied from the WordPress admin panel, and then click the “CREATE” button.

The image below shows the authorized URL in the WP plugin interface. Click “Copy text” in the red box shown in the image to copy it, then paste it into the “Authorized Redirection URLs” field above.

Clicking the “CREATE” button above will take you to the screen shown below. Click the icons highlighted in red in the image below to copy the “CLIENT ID” and “Client Secret,” then paste them into the corresponding fields in the WordPress plugin interface.

3. Return to the WordPress plugin interface and paste the “CLIENT ID” and “Client Secret” you copied in the previous step into the corresponding fields shown in the image below. Be sure to check the locations carefully to avoid making a mistake.

Click “Authorize”↓

Go to the authorization screen, check the consent box, and click the “Accept” button↓.

4- You will now be automatically redirected back to the WordPress plugin interface. At the bottom, you’ll see three new input fields. Follow the on-screen prompts to select the email format and sender address, enter the sender’s name, press Enter on your keyboard, and then authorize the connection once more.
Mail Format: We recommend selecting “HTML” for a more visually appealing format. If you later find that your emails are consistently ending up in the spam folder, switch to "Plaintext."
From Email Address: Select the sender's email address. Usually, the default option is the only one available, so you can ignore this. If you've created an email alias, you can select it here;
Note: In the "From" field of the website's inquiry form widget/plugin, you must enter the email address selected here for the form to submit properly; otherwise, the form may not submit.
From Name: This is the sender’s name that appears in the recipient’s email inbox. Generally, enter the company name, website name, or brand name—just make sure it’s short and easy to recognize.

Once you have finished filling out the form, press the Enter key on your keyboard. This will take you back to the authorization page shown below. Check the consent box and click the “Accept” button↓.
After being automatically redirected back to the website, the message “Access Granted” will appear at the top, indicating that the email account has been successfully linked. The website can now send emails externally via ZOHO Mail.

Next, we'll test the website's email sending functionality:
Click the “Test Mail” menu in the plugin to open the email testing interface. Simply fill in the information as shown in the image below. Enter the URL of your other email address in the “Recipient Email” field; you can enter any subject line and message content you like.
If the “Recipient Email” receives the message after you click “Send Mail,” it means the website's email sending functionality has been successfully set up.
Note: If your website previously had other SMTP or email plugins installed that connected to external email services to send messages, you must first disable those plugins before testing the email sending functionality. Once the email sending functionality is working properly, you can uninstall the other SMTP or email plugins.

How to set mailbox alias for ZOHO mailbox?
After logging in to your email, go to https://mailadmin.zoho.com/cpanel/home.do#users, click the mailbox you want to set an alias for ↓.

Tap “Email Settings,” then tap “+ Add.”

Enter the display name and mailbox prefix and click "Add".

After you finish adding, you can see the mailbox alias you just added↓.

How to relocate emails in ZOHO mailbox
If an email address has been used before, you can migrate all previous emails to ZOHO. Go to the email management console, navigate to the screen shown below, click “Start Migrating Data,” and follow the steps. Click here to view the detailed tutorial. After the migration is complete, you’ll be able to view the emails in the web-based email client.

After binding Foxmail, a window will pop up automatically asking if you want to import emails between, just follow the steps.
How to renew ZOHO mailbox?
ZOHO Mail renewals use an automatic billing system. You must link a credit card or PayPal account in advance, and payment will be automatically charged upon expiration; manual early renewal is not available.
So just make sure to link your credit card or PayPal account. If your payment method expires, your renewal will fail, and you’ll need to link a new payment method: Log in to the web version of your email account, where you’ll see a renewal reminder at the top. Click “Renew” to go to the payment method settings page shown below.

After entering your credit card information, click “Update Profile” to verify it, and ZOHO will automatically charge your card. The card verification code is the three black, italicized digits located on the far right in the middle of the back of the card. If you want to link PayPal, click “Payment” and follow the steps.

ZOHO mailbox sending restrictions, blocked and release methods
To prevent spam and control costs, all email accounts have sending limits, and ZOHO is no exception. Click here to view details on ZOHO email limits. You can increase your sending limit to 2,500 emails per day, but this requires an additional fee. Please contact customer service for more information. sales@zohocorp.com.
Note: ZOHO has a bounce monitoring system. If a large number of emails bounce back, your account may be automatically suspended. You should verify that the recipients' email addresses are valid and check whether the email content contains words or links that are likely to be blocked.
ZOHO anomalous email campaigns include, but are not limited to, the following:
- Sending large numbers of undeliverable e-mails (bounced e-mails)
- Send a large number of emails in a short period of time
- Each email is sent to a large number of recipients
- Send mass emails in a day
- Send emails to a large number of recipients in one day
- Sending unintentional spam or emails that violate Zoho's anti-spam policy
- Multiple suspicious login attempts from different locations during a specific time period.
If you suddenly can't send emails, log in to the web version of your inbox and send any email. A prompt like the one shown below should appear at the top, displaying the error code indicating why you can't send emails. Take a screenshot and save it. First, try clicking “Click here” to unblock your account yourself; if successful, your email account will return to normal.

If there is no option to unlock it yourself, or if the unlock attempt fails, contact customer service for assistance. Send a screenshot of the error code you saved earlier toabuse@zohocorp.com as well as support@zohomail.comPlease help me get my email account unblocked. Email accounts are usually blocked because of excessive spam or because the emails contain inappropriate content.
2025.07.08更新:小迪一个ZOHO邮箱收到下面来自noreply@zoho.com的邮件,说我邮箱发件功能被限制。
I checked the send log because two client websites received a large number of inquiries in a short period of time, and too many similar inquiry emails (similar to marketing or transactional emails) were sent through our email account, which triggered the automatic risk control system.

Just click the blue “Click Here” link in the middle of the email shown above to open the unlock page in your browser, enter the verification code, and click to unlock—it's that simple.

A reminder: Do not use ZOHO email to send cold emails. If the system detects this, it will automatically suspend your ability to send emails, though it’s easy to get your account unblocked. ZOHO email is best used for business communication—it offers high delivery rates and is affordable. For cold emails, we recommend using Zoho Campaigns.
ZOHO received two identical emails
If you choose POP mode when you bind Foxmail or other software, the emails sent out from the website via SMTP will also enter the inbox of the outgoing mailbox. This serves as a reminder and we quite like this feature.
If the email address set to receive inquiries on a website form is the same as the sender's email address, this will result in two identical emails being received. To resolve this, rebind Foxmail using IMAP mode, or set the email address for receiving inquiries to a different one.


How to change Super Administrator in ZOHO
By default, ZOHO designates the first email account created as the super administrator, and only that account can log in to the admin panel to perform many of the operations described in the tutorial above. If there are multiple email accounts under the same account with different domain names, you can change the super administrator to another email account.
After using the administrator mailbox mailbox, first go toinstrument panels, then go to the “Organizations” section. Click the pencil icon shown in the image below.

Click the blue button shown in the image below ↓. If you see a message stating that there are no administrators associated with this account, click the “Administrators” section below “Super Administrator” (highlighted in the red box in the image below), designate another email address as an administrator, and then try the operation again.

Click the button next to the target mailbox.

Click "Assign" to modify successfully. If your ZOHO mailbox uses APP verification method such as Google Authentication, the browser will pop-up window to ask you to input the verification code, after verification, the modification will be successful.

What are the differences between Zoho CPaaS, Zoho Mail, and Zoho Campaigns?
ZOHO has broken down its email sending features into too many categories. At first, Xiao Di couldn’t figure it out—after all, they’re all for sending emails externally, so why split them into three separate products, making things so complicated and troublesome? Only after learning more did she understand the reasoning behind it: to improve the experience of sending and receiving emails and to comply with legal requirements.
Zoho CPaaS: Specifically used for sending transactional emails, such as when we click "Reset Password" on a website and the site sends a password reset email. It is also used for sending inquiry notifications and order notifications;
Zoho Mail: Specifically for sending business emails—it’s the email account we use on a regular basis to communicate with clients about orders;
Zoho Campaigns: Specifically designed for sending marketing (advertising) emails—the promotional emails we often receive are sent this way. Use this to send bulk outreach emails for international trade.
The key is that IP credibility must not be compromised.
This is the fundamental contradiction of email infrastructure: the reputation of a sending IP address is shared and fragile. The "spam complaint rates" for these three types of emails naturally differ by several orders of magnitude—
- Business Emails:When users click "Forgot Password" on the website or receive password reset emails from the site, the complaint rate is close to 0;
- Business Emails:In normal business dealings, such as negotiations for international trade orders, the complaint rate is extremely low;
- Marketing Emails:Even if it’s legal and even if it’s opt-in, the complaint rate is tens or even hundreds of times higher than that of transactional emails, and the bounce rate is also higher (there are always invalid addresses on the list).
Once the three categories share an IP pool,Marketing EmailsComplaints can lower the reputation of the entire IP pool, resulting in customers’ password reset emails ending up in the spam folder along with your responses to their inquiries. So it’s not that Zoho is overcomplicating things—it’s just that combining these elements is bound to backfire. Google, Microsoft, and Amazon all use the same separation method (SES even lets you configure your own dedicated IP pool for isolation).
There are a few added benefits once you open it up
- Compliance:Marketing emails are subject to CAN-SPAM and GDPR regulations and must include an unsubscribe link and require opt-in consent; transactional emails are not subject to these restrictions, and requiring an unsubscribe option would actually be odd. It’s impossible to incorporate the requirements of both sets of laws into a single product.
- Differences in Infrastructure Orientation:Transactional emails require delivery within seconds (an OTP is useless if it’s even 30 seconds late); marketing emails require high throughput (50,000 emails at a time). One is latency-sensitive, and the other is bandwidth-sensitive, so the server configurations are different.
- Pricing models are inherently different: Mail is sold per user, Campaigns per subscriber, and CPaaS per email—selling them separately makes sense, but bundling them makes it hard to keep track of the numbers.
- Risk Control Granularity:CPaaS can be isolated by agent, so if a site receives a complaint, only that specific agent is taken down; with email, your entire business email account is blocked.
Zoho itself realizes that this approach can be confusing—which is why it added a ZeptoMail entry point in the Mail Admin Console, allowing users to set up and manage both services from the same admin panel, with accounts linked across platforms and DNS settings configured together. Although there are three products, the entry points are consolidated into a single location as much as possible.
ZOHO Mail FAQs & Solutions
For any email-related issues, please contact our email support team. support@zohoaccounts.com Solution. If you want to fix this yourself, check out the tutorial below. If you encounter any other issues, feel free to leave a comment below.
Unable to link the phone number associated with the registered email address
If you enable mandatory multi-factor authentication after registering an account, you will be required to link and verify a phone number before logging in to your email via the web or the app (SMTP login does not require verification). Additionally, you cannot link the phone number used to register your email account.
The registered cell phone number defaults to the recovery/modified email password number, and ZOHO requires that the login verification cell phone number cannot be the same as the recovery number.
There are 2 solutions.
Method I: Simply turn off two-factor authentication—this is the easiest way. Log in to your email accountmanagement console, Click the button in the image below to disable mandatory multi-factor authentication. Once disabled, you won't need to verify your identity when logging in to your email.

The above disables two-factor authentication for all email addresses associated with this account; however, you can still log in to the My Account section for each individual email account to enable or disable two-factor authentication separately ↓.

Method II: Simply follow the prompts to link your phone number and enable two-factor authentication—this provides an extra layer of security. Once your phone number is linked and verified, you’ll be able to log in to your email account. If you need to change your linked phone number later, go toMobile Number Change PageClick on Add Mobile Number at the bottom of the page Add a new cell phone number.
Click the round button next to the new number Change the number to "multi-factor authentication mobile number".

Click the delete button next to the number to delete the cell phone number that you have tied at the beginning.

An error message appears when opening a compressed file attachment in an email
ZOHO restricts access to these types of attachments by default, so clicking to open them will result in an error message. You'll need to save the file first and then open it, or set it to “Public” as shown in the image below.

Clients such as Foxmail Suddenly Fail to Connect to Email Accounts via POP or IMAP
The client app had been sending and receiving emails normally, but suddenly it could no longer connect, displaying the message shown in the image below. However, the web version is working fine. I contacted Zoho support (support@zohomail.com), and they said they suspected my email account had been hacked, so they temporarily disabled the POP and IMAP functions.
Customer service explained that the email account had been accessed via POP connections from multiple different regions, leading them to suspect it had been compromised. It turned out this was caused by using a VPN, so I was advised not to constantly switch the VPN to different countries. I sent an email to customer service to explain the situation clearly, and they immediately unblocked my account.

Diiamo also had customer service adjust the security settings on my email account so that it won’t get locked out when I log in from multiple different regions in the future. This will reduce security slightly, but given our specific usage circumstances, we need to set it up this way.

Just a side note: only paid email customer service providers overseas respond this promptly and professionally. If a domestic corporate email customer service team were handling it, most issues wouldn’t get resolved—they might not even reply at all. Overseas customer service is about solving problems; domestic customer service “solves” the person who raised the issue.
The message “Error: SSL ShakeHand: The server does not support SSL. Please check the server configuration. errorCode: 1” appears when sending a message.”
Once, Xiao Di was unable to send an email and received the message shown in the image below. After closing the VPN software, everything returned to normal, but when the VPN software was reactivated, the same error occurred again. It appears to be a network issue with the VPN software.

I uninstalled the authentication app and can't log in to my email
If you have enabled the “Time-Based Dynamic CAPTCHA Authenticator” shown in the image below in your email account’s admin panel, you won’t be able to access certain email features if your phone isn’t with you or if you’ve uninstalled the authenticator app (some features require a verification code to log in and use).
Temporary Login Method:
In the tutorial above on enabling secure login verification, Xiao Mo reminded users to download and back up their verification codes (recovery codes). You can use these backup verification codes to log in temporarily; all verification codes are one-time use and expire after use.
On the email login page, where you're prompted to enter a dynamic verification code, click “Can't access your device?” at the bottom.
Note: There’s a potential issue here. If you’ve logged in on this computer before and your password is saved for autofill, you’ll be automatically redirected to the verification code page, but the message shown in the image below—“Can’t access your device?”—won’t appear. You’ll need to click “Not you?” to return to the initial login page and re-enter your password to log in. You can also try logging in using your browser’s incognito mode or a different browser.

Click “Use Backup Verification Code” ↓.

Enter the 12-digit verification code ↓, then click “Verify.”
The backup verification code is a .txt file containing four sets of verification codes, with spaces between each set. When using it, you need to remove the spaces, then copy any one of the 12-digit verification codes and paste it into the input field shown below.

Remove/Rebind an Authenticator:
To resolve this once and for all, you'll need to remove or rebind your authenticator.
Log in to proceedGeneral Email Management Dashboard, Turn off the “Multi-Factor Authentication” feature shown in the image below ↓. If it's already turned off, skip this step.

EnterPersonal Email Management Dashboard, Delete “Authentication App” ↓ as shown in the image below, and you'll be able to log in to your email.

If you want to re-enable login verification, you can install an authentication app (such as Google Authenticator) on your phone and then re-link your account.
The "Reply To" feature is unavailable
“Reply To” is a feature that specifies which email address the recipient should reply to when responding to an email. For example: If Email A sends an email to Email B and sets "Reply To" to Email C, when Email B receives the email and replies, the reply will be sent to Email C instead of Email A. This is how the "Reply To" feature works.
This feature is very useful when sending inquiries to websites:The website uses an SMTP/API connection to Email Address A to send an inquiry email to Website Client’s Email Address B, with the “Reply-To” field set to Visitor’s Email Address C, who submitted the inquiry. When the website client replies directly to the inquiry, the email is sent to C, which is very convenient.
If the "Reply To" field is not set, in the example above, the website owner would have to create a new email and paste Visitor C’s email address into the "To" field to send a message—which is quite a hassle. Therefore, while the "Reply To" feature is very useful for sending inquiries from a website, it is generally not needed for everyday email communication.
ZOHO Mail is a bit unique in that it restricts the "Reply To" feature, requiring you toEmail SettingsYou must add an email address here to use it↓, and you can only add one, so its use is limited.
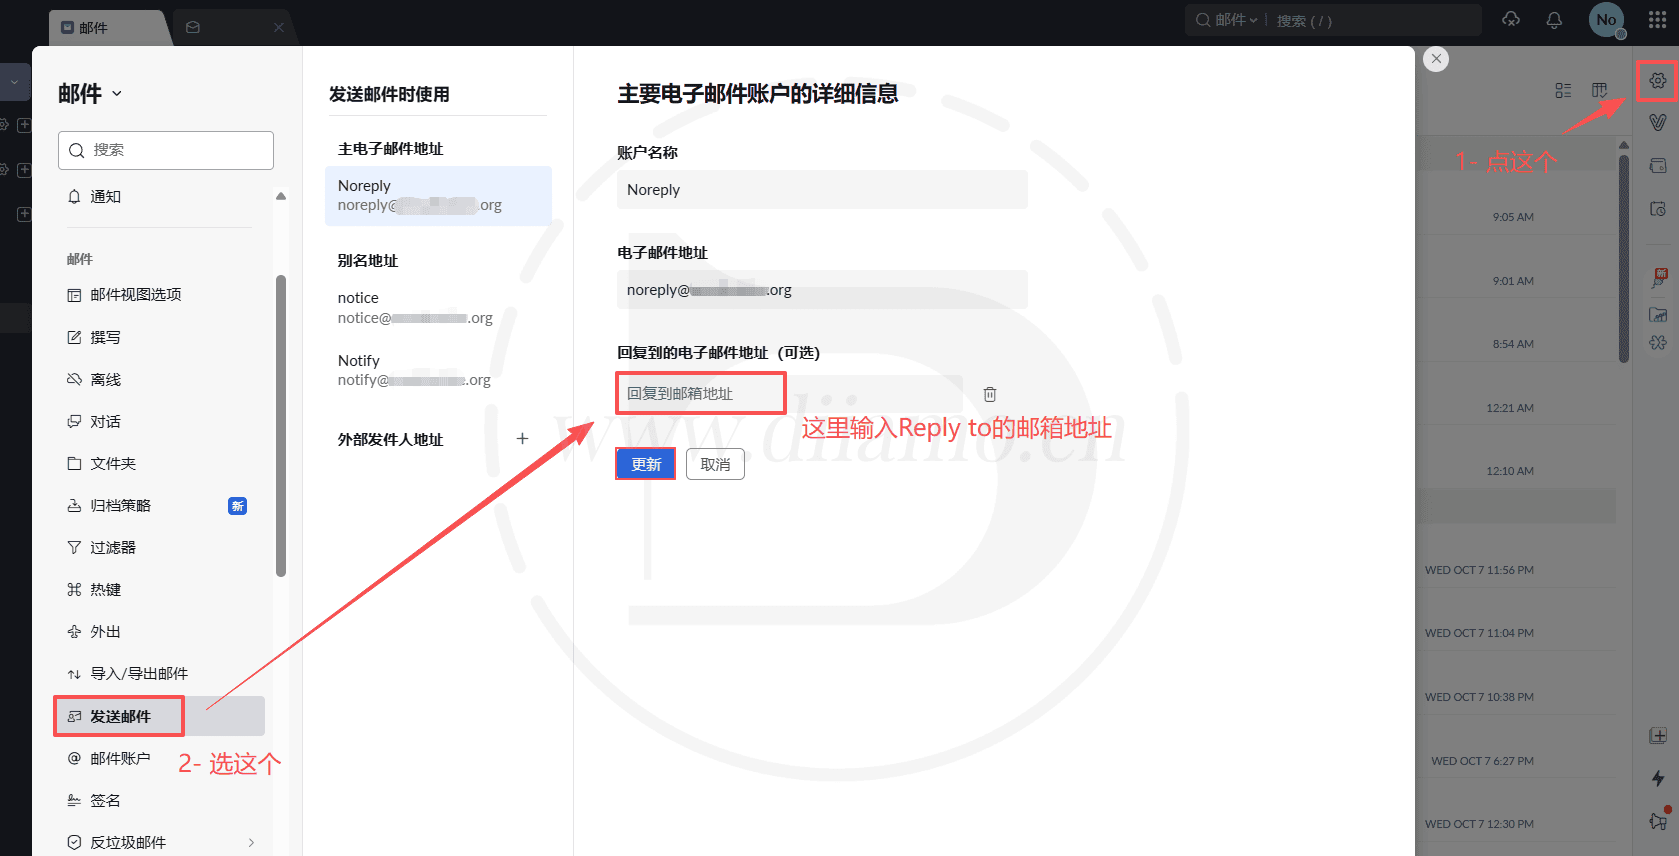
If you must use the "Reply To" feature to send inquiries via a website link, we recommend usingZoho CPaaSFeatures, UsageZoho ZeptoMail PluginLink to the WordPress site. Please check the details yourself.
Four Key Differences Between Standard Zoho Mail and Zoho CPaaS:
1. The quota mechanisms are completely different
Zoho Mail’s outbound sending limit is a dynamic quota of 50–500 emails per hour, which fluctuates based on sending reputation and the quality of recipient engagement. There is no fixed daily limit, meaning the upper limit is unpredictable. What’s more troublesome is that this quota is shared across the entire email account—emails from the website, sales reps replying to inquiries, emails sent via aliases, and out-of-office auto-replies are all counted toward the same total. CPaaS, on the other hand, operates on a purchased credit system, with 10,000 emails per tier, allowing you to control the volume yourself.
2. Reputation isolation is the key to a foreign trade website’s success
This is the most critical point. If you use a business email address like sales@yourdomain.com to send password resets or form notifications, and a batch of those emails is flagged as spam or has a high bounce rate, the reputation of your business email domain will suffer. As a result, customer inquiry emails may fail to deliver or end up in the recipient’s spam folder. CPaaS uses agent-level isolation: one agent per site or use case, each with its own independent reputation and suppression list, handling only transactional traffic. As a result, the shared IP pool remains clean.
3. Operations Visibility
CPaaS offers bounce statistics, bounce recovery (using the return-path CNAME), open/click tracking, resending of failed emails, and log filtering by error code. With Zoho Mail SMTP, once the email is sent, that’s it—you won’t know if your website’s emails fail, and your customers won’t tell you either.
4. Skills
CPaaS only sends messages—it doesn’t receive them and has no inbox. It offers bulk/template APIs, webhooks, and a file cache for attachments, and it can be integrated with SMS, WhatsApp, and Voice using the same console and account. Zoho Mail’s SMTP serves as the "client-side sending" channel.