LatestObject Cache Pro Download (Formerly known as Redis Object Cache Pro) This is an enterprise-grade object caching plugin designed for WordPress to improve site performance. Using Redis to cache objects in WordPress (such as posts, pages, comments, taxonomies, etc.) into memory reduces the number of database queries, which greatly improves page load speed,Responsiveness.
It also improves the speed of access to the backend, the frontend search function, filtering function and so on. Especially for Woocommerce sites that have to deal with a lot of dynamic content and high traffic, using a caching plugin like Redis Object Cache Pro is very beneficial.However, it may not be very helpful for static sites, which tend to involve few database queries, so the object store is of limited use.
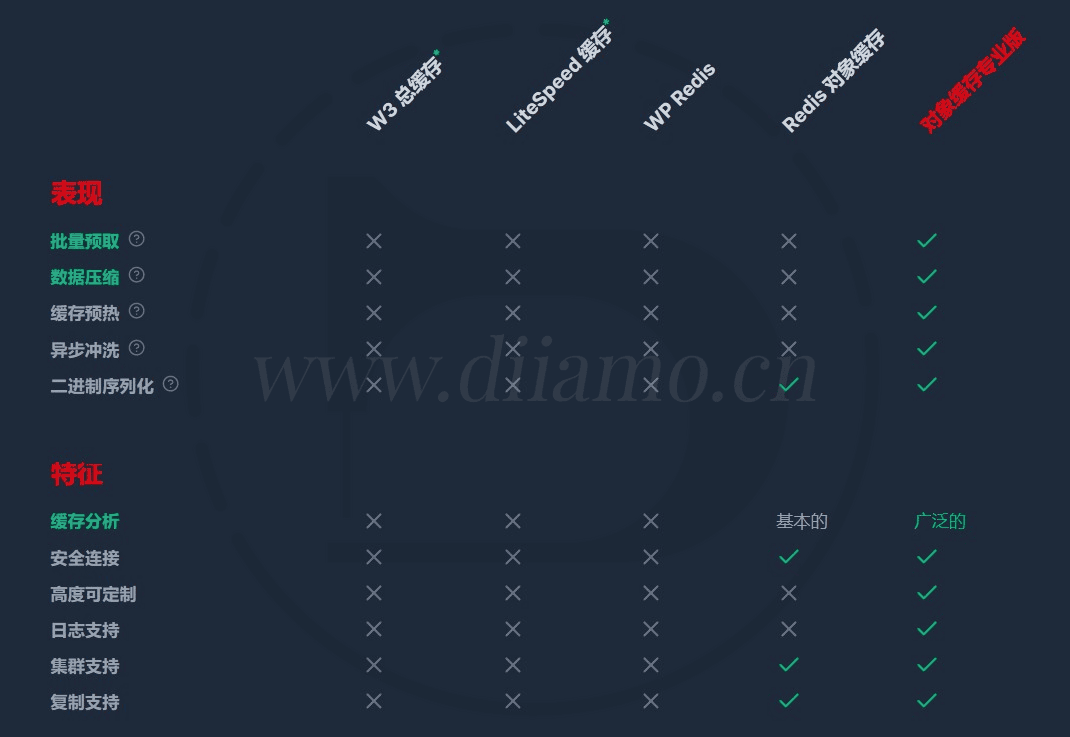
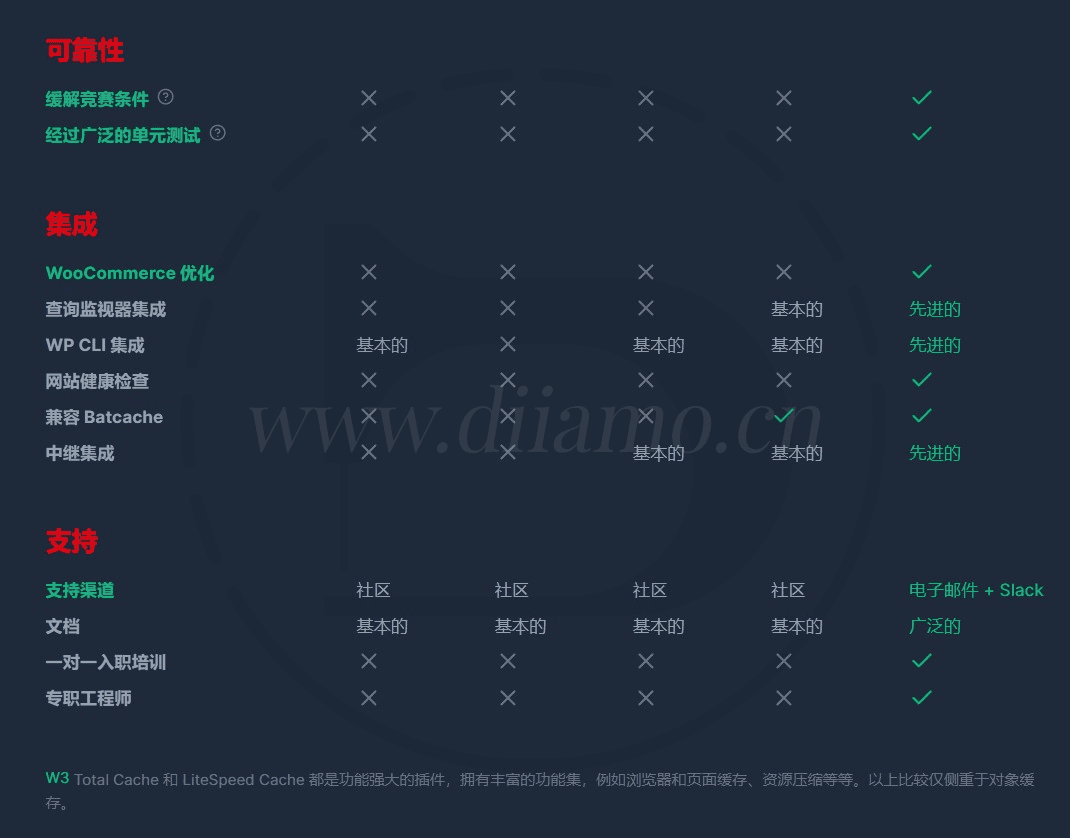
Difference between Pro version and free version ↓:
- Rewriting for raw performance
- 100% WordPress API Compatible
- Faster serialization and compression
- Easy debugging and logging
- Cache prefetching and analysis
- Full Unit Testing (100% Code Coverage)
- Protecting Connections with TLS
- Health Checks via WordPress and WP CLI
- Optimized for WooCommerce, Jetpack and Yoast SEO
- Faster binary serialization support
- LZF, LZ4 and ZSTD Compression
- asynchronous flushing
- Batch key prefetching
- Batcache and WP Rocket Support
- Using Semantic Version Control
- Multi-site network support
Object Cache Pro is an object cache that can be used in conjunction with theNginx-FastcgiThe system cache as well as theWp Rocketand other page caching plug-ins to use together, because they cache the target as well as the role of different levels. However, the use of multiple caches together need to be configured, otherwise it is easy to duplicate the cache resulting in slow speed or conflict.
It can also cache some background operations to speed up background access. If the background made some changes did not take effect in time, refresh the Redis cache can be.
Use this plugin to achieve Redis object cache can no longer use Mamcached object cache , the site can only use an object cache . After the use of object caching, there is no need to use the database cache, easy to have conflicts.
What's the difference between the free version and the paid version?
The Pro version further reduces the number of Redis requests and memory footprint through technologies such as Bulk Key Prefetching and igbinary serialization, which again improves theoretical performance by about 151 TP5T-201 TP5T. Theoretical performance is again improved by about 151 TP5T-201 TP5T, but this optimization is not obvious for sites with fewer visits and less data.
Pro version is deeply optimized for dynamic content of WooCommerce and other plug-ins, automatically identifying high-frequency queries and preloading them, and avoiding cache-penetration problems if the site contains real-time inventory display or dynamic forms.
Memory compression:Supporting LZ4/ZSTD algorithm, the memory occupation is reduced by 50%, which is suitable for the scenario of long-term operation and gradually increasing data volume.
Stability Guarantee:Built-in health check and automatic failover to avoid caching service crashes that can bring down websites.
Debugging Tools:Provides real-time hit rate monitoring for troubleshooting cache failures
The Pro version doesn't have a top cache clearing button, the free version does, for a reason:
1- Till Krüss, the developer of Object Cache Pro, has made it clear that he hates the way other plugins fill the WordPress top toolbar with icons and buttons. In order to keep the backend interface clean and tidy, he decided not to include this often-touched button in the official functionality.
Version 2- Pro deeply integrates with the WordPress caching mechanism. Under normal circumstances, when you publish a new post, modify a page or plugin settings, the plugin will automatically correspond to the cache fragment. That is to say, it can “automatically update what should be updated, should not move not move”, in theory, almost no longer need to frequently go to the global clear cache.
What is a GPL licensed plugin
This plugin is a GPL licensed product and is safe and legal. Click to learn what isGPL AgreementClick to learnWordPress official website about GPL. Simply put using the GPL license plugin/theme source code open source sharing, can be legally free to change, use, distribution.
The company that owns the plugin/theme mentioned in the title of this item is not affiliated with us in any way, and the company has not licensed its products or brands to us. This product is a distribution of the plugin/theme mentioned in the title, created by a third party company/developer and redistributed by us under the terms of the General Public License (GPL).
We use the plugin/theme name for the sole purpose of identifying the plugin/theme on which this product is based, with the intention of helping users better understand the functionality and possible application scenarios of our product, and in no way to impersonate or mislead. This product is sold under and respects the terms of the GPL license agreement and ensures that users are aware that they are acquiring a distribution of the plugin/theme based on an open source license. They are allowed to view, modify and redistribute the software to promote its free use and development.
Verified by Security Antivirus
Directly from foreign formal channels to buy, do not modify the source code. All plug-ins we use to build their own sites, used in a number of sites, safe, stable and reliable.Are you worried that the plugin is not secure? Check this articel:Is WordPress Cracked Plugins/Themes (Green, GPL, Nulled) Safe?.
- ByVirustotal Antivirus Verification;.
- ByWordfenceSource code review.
- BySucuriSecurity antivirus scanning.

Object Cache Pro Update Methods/Records
General new version out within 24 hours of this site will be updated, then please visit this page directly to download the new version of the installation package upload update, the product title will be written on the latest version number. Can only be updated by uploading the installation package, mind not to shoot, if you want to update online please support the original version to go to the official website of the plug-in to buy.
Click to view the update history of this plugin (Changelog).
Object Cache Pro Download Terms of Purchase
This site plug-in purchased from foreign sites, the purchase price is4.99 USD/pcThe price is 2 years. Diiamo uniform selling price of 19 yuan / a, spend a lot of effort to produce the use of tutorials + provide manual Q&A service, absolutely value for money.
Plug-in for learning and research purposes only, virtual products are reproducible, once sold no refund, please move to the detailsTerms of Service. Please log in before purchasing, and refresh the page after purchase to get permission to download the plug-in.
Diiamo for the purchase of users to provide after-sales service, plug-in use any questions please leave a message in the comments below, there will be answers to questions.
Installation / Activation Method
Directly install the zip installer that you purchased and downloaded from this site and enable it. If you have installed the free version, uninstall the free version first.
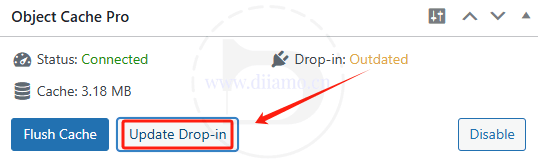
After installing or updating the plugin, you may see the Outdated prompt shown below, just click the "Update Drop-in" button to update it.
Installation method 1: Upload and install
Find and click on "Plugins" > "Install Plugins" in the left menu bar of the website background, then click on "Upload Plugin" in the upper left corner, upload the downloaded zip installation package and click on "Install Now", after installation, click"Enable Plugin"Complete the installation.

Installation method 2.FTP installation
Unzip the plug-in package, put the unzippedFoldersUpload it to the plugins directory (xxx.com/wp-content/plugins).
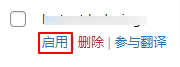
Find and click on "Plugins" > "Installed Plugins" in the left menu bar of the website background, find the plugin in the list of plugins, and click "Enable".
Object Cache Pro Configuration Enablement Method
Note: If prompted with a new version of the update, please do not directly update online in the background, it will lead to plug-in abnormal. Please download the new version on this page to override the installation of the update, if the installation shows that there are 2 of the same plug-in, please disable the uninstallation of the older version.
Note: Some configurations rely heavily on server settings and performance, so it is often the case that the website cannot be opened after adding a configuration error. Try to add as few configurations as possible at the beginning, and then add other configurations one by one if there is no abnormality on the website.
Note: If the site appears abnormal after adding configuration can not open, delete the last half of the configuration content, save and refresh the site should return to normal. Then add the remaining configurations one by one, don't add the configurations that cause the website to have problems.
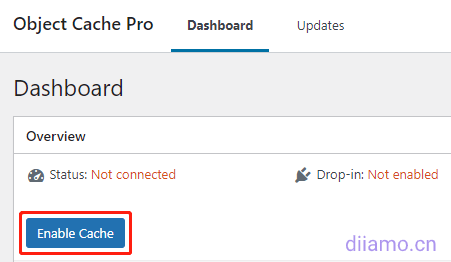
The server PHP needs to have the Redis extension installed firstand then put the following configuration code (Just pick 1 of the 2 codes.) Copy and paste it into the root directory wp-config.php, go back to the plugin settings page and click “Enable Cache” to enable it.
It is also possible to use the officialRecommended configuration.
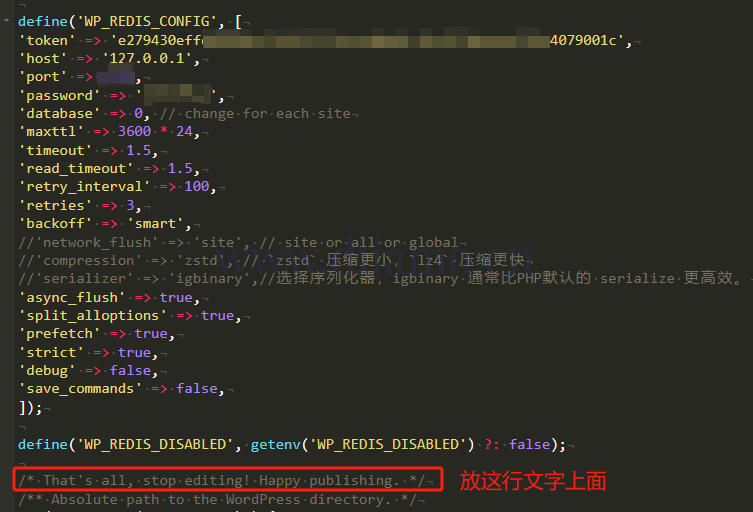
Note that all the lines of the following code have a comma at the end of the parameter setting line , . If you can see the request data in the Dashboard Object Cache widget, the configuration was successful.
Recommended configuration code ↓, suitable for the vast majority of sites, blog sites and foreign trade sites to choose it.
The last two configurations, network_flush and async_flush, are specifically for theMultisite siteDelete the // Effective. Click to view the officialMulti-network site configurationDetailed explanation.
'password' => 'xxx',: the role is to set the Redis password, if your Redis has set the password (recommended), put the code line 5 of thexxxReplace it with the Redis password, then delete the 'password' in front of the//, the code will take effect.
If Redis has not set a password, it is ignored and there is no need to use it.
‘database’ => Specify the Redis database number, if there are multiple sites using the same Redis server, you need to specify a different database number for each site. The default is 0. The maximum number of numbers supported depends on the number of databases supported by the Redis server.
Tip: If you have more than one website inside your server using this plugin, you need to set 'database' => 0 for the first website, 'database' => 1 for the second, and so on. Otherwise the site will be abnormal.
High-performance configuration code ↓, suitable for dynamic large-scale sites, e-commerce site to choose it.
Caution:'compression' => 'zstd' and 'serializer' => 'igbinary' These 2 features require the zstd and igbinary PHP extensions to be installed first, restart PHP and Redis after installation, shared and managed hosting do not require a restart.
In many cases, the Baota Panel does not support 'compression' => 'zstd' and 'serializer' => 'igbinary“; enabling them will cause the website to malfunction. If your website displays the error ”Error establishing a Redis connection" after adding this code, remove these two settings, save the changes, and restart PHP and Redis to restore normal operation. Shared and managed hosting accounts do not require a restart.
Some pagoda panels these 2 extensions don't seem to be very compatible and may cause the site to not open. If the anomaly occurs, change to the “Recommended Configuration Code” above and restart PHP and Redis, shared and managed hosting do not require a restart.
The last two configurations, network_flush and async_flush, are specifically for theMultisite siteDelete the // Effective. Click to view the officialMulti-network site configurationDetailed explanation.
'serializer' => 'igbinary': can improve the processing speed of cached data and reduce the memory consumption of cached data, some servers enable this configuration may lead to website anomaly.
'compression' => 'zstd': set compressionReduction algorithm, further less data size, some servers with this configuration enabled may cause site anomalies.
host' => Specify the Redis server address, or '127.0.0.1' if it is on the same host as the WEB server.
'port' => Redis connection port, the default is 6379, if you change the default port in Redis, then this should follow.
'password' => 'xxx',: function is to set Redis password, if your Redis has set password, replace xxx in line 5 of the code with Redis password, then delete // in front of 'password', the code will take effect. If Redis has not set password, ignore it, no need to use it.
‘database’ => Specify the Redis database number, if there are multiple sites using the same Redis server, you need to specify a different database number for each site. The default is 0. The maximum number of numbers supported depends on the number of databases supported by the Redis server.
Tip: If you have more than one website inside your server using this plugin, you need to set 'database' => 0 for the first website, 'database' => 1 for the second, and so on. Otherwise the site will be abnormal.
'username' => the username for connecting to Redis, it is not required if Redis is not set up for login authentication. Example usage: 'username' => 'abc',
'prefix' => Similar to WP's $able_prefix variable, which adds a prefix to all database table names. Example: 'prefix' => 'mysitename',
'maxttl' => enforce "maximum time to live" in seconds for all new cache keys. Example: 'maxttl' => 3600 * 24, // 24 hours
'timeout' => connection timeout with Redis, in seconds, supports decimals. Example: 'timeout' => 1.5,
'read_timeout' => read timeout in seconds, decimals supported, same usage as above.
'retry_interval' => retry interval, in milliseconds, integer supported. Example: 'retry_interval' => 300,
'retries' => Set the number of retries for a failed connection, integer type.
'backoff' => 'default', when using the retry configuration, the default backoff configuration will be used, which includes: a de-correlated jitter algorithm, a base of 500 ms for compensation calculation, and a compensation time limit of 750 ms
'shared' => true, sets whether the Redis server/cluster is shared or dedicated. This affects how memory and key counts are displayed.
'async_flush' => true, Asynchronous flush was introduced in Redis 4.0 and can be enabled using this async_flush option. It allows deleting a large number of Keys in the background without blocking the server.
'prefetch' => true, When prefetching is enabled, the requested cached keys are stored on a per-request basis and are loaded in bulk by group early in successive requests. The list of prefetchable keys is updated on each request to keep it up to date.
'split_alloptions' => true: Store alloptions keys as a hash in Redis instead of a single serialized string. This can improve performance and reduce memory usage.
The above are some common parameters, basically meet most of the website needs, such as the need to understand all the parameters please checkOfficial Documents.
For advanced features such as compression and asynchronous refresh, please seeConfiguration OptionsThe full list of To connect to a Redis cluster or use replication, seeConnection Guide.
After installing the code, tap Enable Cache ↓ on the plugin page.
After installing, or after updating the version, you may see the Outdated prompt as shown below, just click the "Update Drop-in" button to update it.
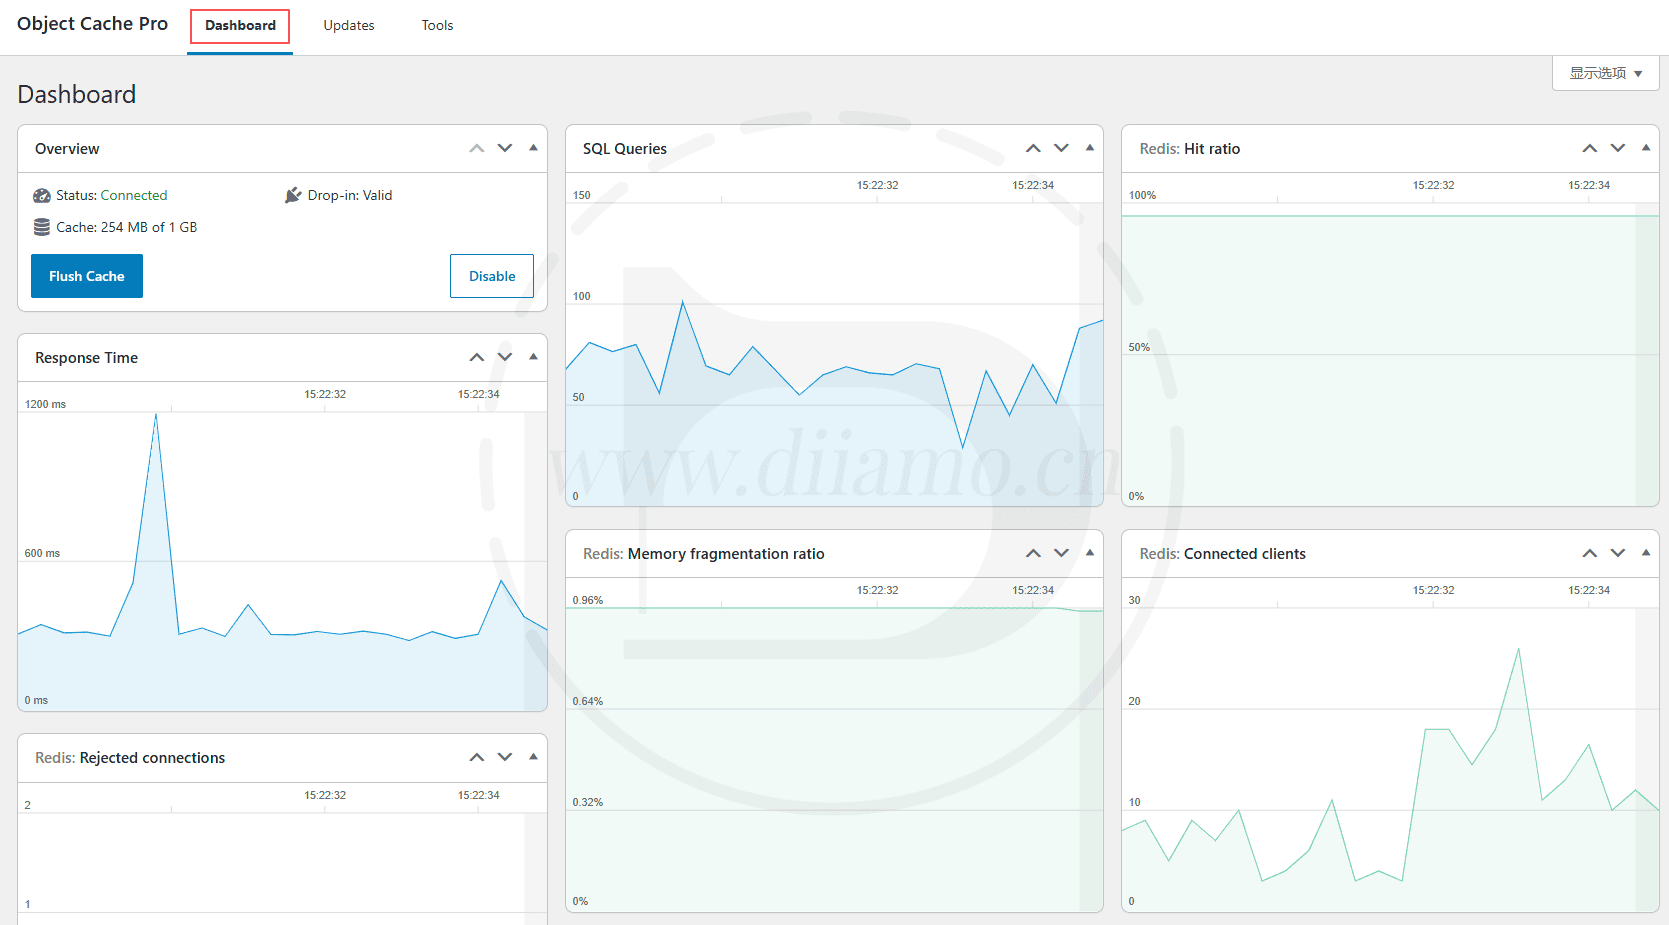
Below is a screenshot after enabling caching for a while, it can successfully display the data and cache size. Click on "Display Options" in the upper right corner to choose which data blocks to display.
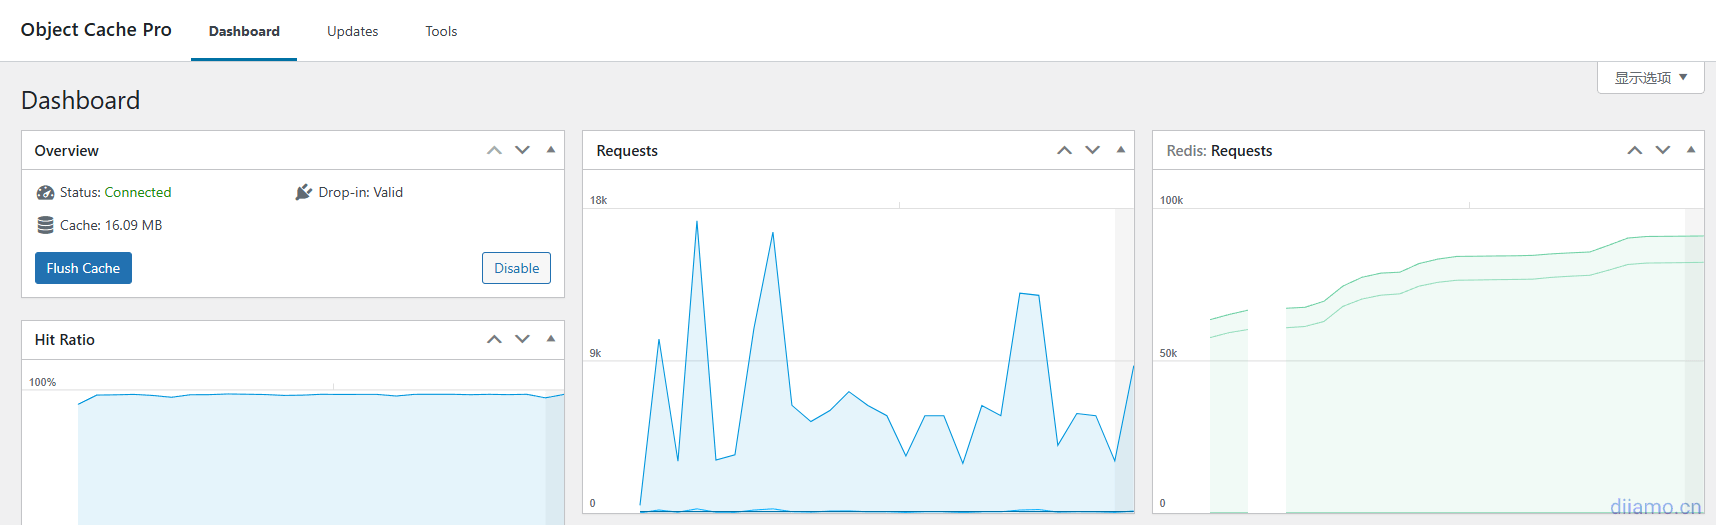
Hits. The number of requests cached in memory.
Misses. The number of requests that have not been cached. Uncached Hits. The number of requests cached in memory.
Hits-to-Misses Ratio. The ratio between requests that have been cached and requests that have not been cached, with larger values indicating better caching.
Successful Key Lookups. The number of successful Redis key lookups.
Failed Key Lookups. The number of failed Redis key lookups.
Hits-to-Misses Ratio. The ratio between hits and misses for Redis key lookups, with larger values indicating better caching.
Cache Reads. The number of reads from the cache.
Datastore Writes. The number of writes to the datastore indicating that the cache is expired or needs to be updated.
Datastore Reads. The number of reads from the data store.
Cache Writes. The number of writes to the cache.
WordPress Render Time. The average time (in milliseconds) it takes WordPress to render a request.
Datastore Response Time. The average time (in milliseconds) to wait for a datastore response.
Memory Allocated. The amount of memory currently allocated.
Used Memory. The amount of memory used.
Memory Ratio. Displays the ratio between allocated memory and the maximum memory that can be allocated.
Average Time Waiting for Datastore Response. The average time (in milliseconds) to wait for a datastore response.
Commands Processed per Second. The number of commands processed, with the value indicating that caching is more effective.
Explanation of Dashboard OCP Widget Data
The image below shows the widgets of the OCP plugin on the dashboard page. The two red boxes display a total of six data points. Xiao Di will briefly explain what each data point represents.
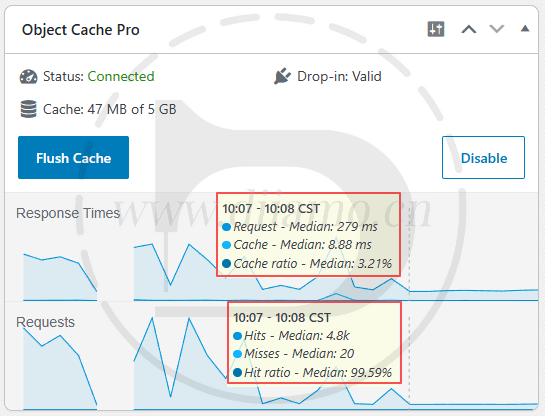
Request - Median: Total request response time (total time taken to load the page): The total time from when the user initiates a request until the website server completes processing and returns a result. When a user opens a page, the process involves not only reading the cache but also executing PHP code, loading images, and handling dynamic logic, taking a total of 279 milliseconds. The longest response time on the Xiao Di website was over 1,700 ms, which is normal.
Cache - Median: Cache response time (cache hit): The time it takes for the server to read data directly from memory and return it when a request hits the Redis in-memory cache. For the Xiao Di website, the highest recorded value is over 40, the lowest is 7, and the average is around 10–20.
Cache ratio - Median: Cache ratio: The proportion of time spent on caching operations out of the total time taken for a single request. 3.21% (low value) indicates that the vast majority of time is spent on non-caching operations (such as PHP script execution, external API calls, etc.). A low value is normal and does not indicate anything significant; there is no need to be concerned about it. The following three metrics are what matter.
Summary:The pure cache time (8.88 ms) is extremely short, proving that as long as the data is in the cache, loading is completed instantly. The long overall time (Request - Median) is likely due to the homepage loading a large number of non-cached dynamic components or third-party resources.
-------------------
Hits - Median: Cache hit count: The number of requests during the reporting period for which the server successfully retrieved the required data from the Redis cache. A higher count is better.
Misses - Median: Cache misses: The number of requests during the reporting period where the server could not find the data in the cache and had to query the database or other underlying storage; the lower the number, the better.
Hit ratio - Median: Cache hit rate: the higher, the better. This is the ratio of cache hits to the total number of valid requests (calculated as: Hits / (Hits + Misses)). It is the most critical metric for measuring cache performance. 99.591 TP5T is an exceptionally strong result, indicating that the vast majority of requests to the website were perfectly intercepted by the cache, resulting in excellent performance.
Common Problems & Solutions
For more tutorials and FAQs, please move toOfficial Documents. Here are a few common questions that have been reported back by Diiamo users.
PHP cache was exported and reported an error
If it's a VPS server with multiple sites, different sitesneedUse different databases and different database prefixesneedset up differently. Click on theView Details.
"Error establishing a Redis connection" after adding configuration
This problem occurs because some configurations in your configuration code are not compatible with the host. Please directly use the “Recommended Configuration Code” above, just restart the PHP and Redis services of your VPS host after configuration, shared and managed hosts don't need to be restarted.
Hosts like SiteGround don't support Redis or have limited functionality to use the Object Cache Pro plugin, and can only use Memcached instead.
"Redis uses the noeviction policy" in Site Health.
In some versions (e.g. 1.24.2), the following message will be displayed in the site health: "Redis uses the noeviction policy", just ignore it, it's not bad.
This tip means that if Redis consumes the allocated free memory (not enough memory to use), it may cause the site to crash, and you need to set the cache expiration time so that it will periodically and automatically clean up the expired cache to free up space.
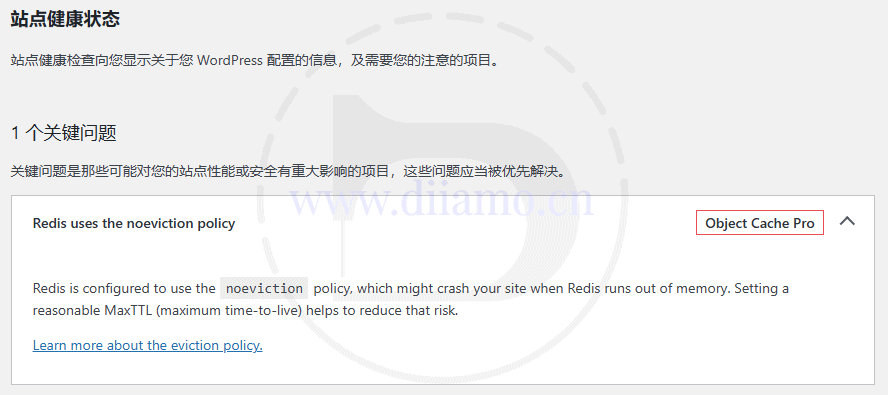
In fact, if you activate the code according to our tutorial above, you will add the red box code in the picture below, this is to set the cache expiration time. At this time, the above error message is a false alarm, you can ignore.
Even if you don't add the red box code, it has no effect. A small and medium-sized website Redis object cache memory is generally only a few tens of MB, up to 200MB. Pagoda default Redis available memory for the server memory capacity, generally a few G.
Multiple sites with low server configurations, pay attention to total memory usage, expand capacity appropriately, etc.

In the Home Dashboard widget, the red box position in the image below will show how much Redis memory is available.
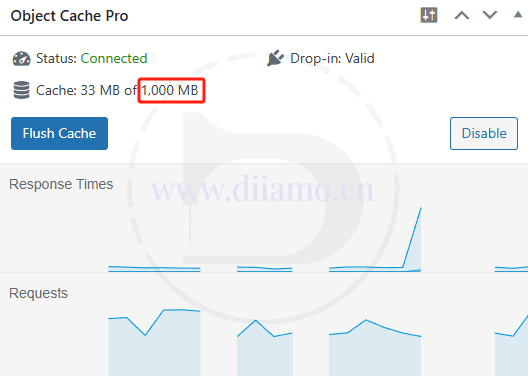
Disable caching for certain content
Some plugins are incompatible with WordPress's persistent object cache, either causing cached data to become stale or directly breaking functionality. These plugins require their cache groups to be excluded from Redis storage. 👉 ClickView Details.
After adding 'serializer' => 'igbinary', the website won't load and displays a 500 error.
This method is designed for the BaoTower control panel; I haven’t tested it with other panels, so please use it for reference only. First, add the following to the plugin configuration in wp-config.php: 'strict' => false, Save the changes. The Object Cache Pro plugin must remain enabled.
Then follow the steps below:
1- Go to “Terminal” in the left sidebar of BaoTower, or connect to the server using SSH or a similar method;
2. Input redis-cli, press the Enter key;
3- If Redis has a password set, enter AUTH Your Redis password , then press Enter. Assuming the password is abc123, you would enter AUTH abc123 Then press the Enter key;
4. Input FLUSHDB, press the Enter key;
When you see “OK” displayed, you're done.
5- Add the following to the plugin configuration in wp-config.php 'serializer' => 'igbinary', Save changes;
6. Go to the wp-content/cache/ directory on your website and delete the object-cache-pro file;
7. Restart PHP;
8. Open the website's admin panel. The site should now be accessible again. Simply click the “Enable Cache” button in the Object Cache Pro plugin, and it will work as expected ↓.
The blue chart below may not appear in some cases; this is normal. You can check the plugin settings page.

Xiao Di successfully enabled 'serializer' => 'igbinary' using the method above. This is provided for reference only. To recap, the logical sequence of events leading to the issue was as follows:
The local cache is the real culprit:The file `wp-content/object-cache.php` (and possibly the `wp-content/cache/` directory) contains a cached version of the role data serialized in PHP's native format from when you first attempted to enable igbinary.
Format conflict:When WordPress starts up, Object Cache Pro first reads this local cache, then attempts to parse the string—which is not actually in the igbinary format—using `igbinary_unserialize()`, causing the parsing to fail and returning the string.
Fatal error:The `WP_Roles` class receives this string instead of an array, and when `array_keys()` is executed, it crashes, resulting in a `TypeError` and a 500 error on the website.
How do I enable 'compression'?
Enable 'compression' => 'lz4' Alternatively, 'zstd' can compress data, offering a slight performance boost (though the improvement is negligible for most websites). However, enabling it is quite complicated—it requires installing lz4/zstd and uninstalling and reinstalling Redis—and is prone to issues.
Xiao Di recommends not enabling 'compression'—the benefits are minimal, and the risks are high. Enabling only 'serializer' => 'igbinary' is sufficient. Although Xiao Di has enabled it as well, it's purely for experimentation; it doesn't actually have much impact on performance.
If you're determined to enable it, here's a general overview:For more information, please contact Tencent Yuanbao or DeepSeek..
We recommend using 'compression' => 'zstd'. This is the official recommendation from Object Cache Pro, as it uses less memory while still delivering excellent overall performance. Installing the zstd extension on BaoTower is also easier than installing lz4.
The following steps are based on PHP 8.3.31. Since each website is different, this guide is for reference only. For more details, please consult the AI. Before proceeding, be sure to create a backup or snapshot of your hosting environment:
1- Install zstd as a PHP extension;
2- Uninstall Redis from the PHP extensions;
3. Run the command in the Baota Terminal to download the PhpRedis source code and extract it (ask the AI for details);
4. Run the command in the terminal to generate the build configuration (ask the AI for details);
5- Search for and install Redis from the app store; we recommend selecting the latest version, 8.x;
6. Run the command in the terminal to configure the compilation parameters (enable igbinary + zstd); for details, ask the AI.
7. Run the "compile" command in the terminal (ask the AI for details);
8. Run the command in the terminal to install redis.so in the PHP extension directory (ask the AI for details);
9. Edit the PHP `php.ini` file, add `extension=redis.so` on a new line at the end, and save the file;
10- Add the following to wp-config.php 'compression' => 'zstd', Configure, then restart Redis and PHP;
If everything goes smoothly, the configuration should be complete at this point, and the website should be accessible. For security reasons, we recommend setting a password for Redis; be sure to add the Redis password to the wp-config.php file.
Site Health Alert: Redis is using the "noeviction" strategy
“Redis has been configured to use thisnoevictionThis is a good strategy, but it can cause the website to crash if Redis runs out of memory. Setting a reasonable MaxTTL (maximum time to live) helps mitigate this risk.”

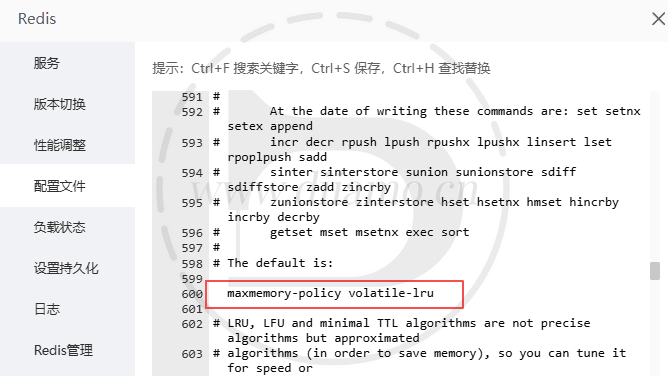
Search for `maxmemory-policy` in the Redis “configuration file” to see if the setting is enabled. By default, it is not enabled in the BaoTower panel; there is a “#” label next to it.
If it's not enabled, delete “#” and replace it with "volatile-lru" (which is more suitable for WP e-commerce sites). The image below shows what it looks like after the change: maxmemory-policy volatile-lru.
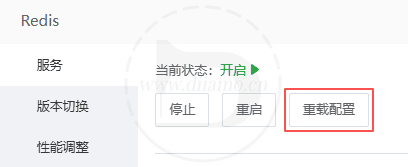
Remember to click “Reload Configuration” in the Redis “Services” section to apply the changes.
Click “Reload Configuration” ↓. Refresh the site health page, and the prompt will disappear.
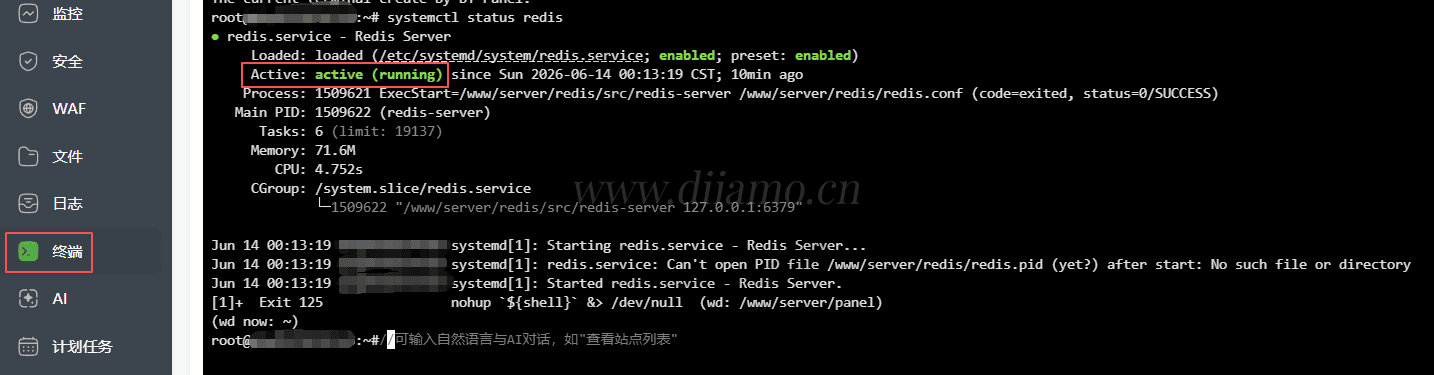
If Redis fails to start after completing the operation, go to the “Terminal” interface on the left side of BaoTower and paste systemctl stop redis Press Enter, then paste systemctl start redis Pressing Enter usually starts Redis successfully.
Paste at the end systemctl status redis Press Enter to display the Redis status. If green text appears active (running) Indicates normal operation.
How do I configure it for use with the W3T caching plugin?
W3TC Cache PluginPage Caching MethodsIf configured to use Redis, The “Redis Database ID”↑ in the “Page Cache” settings shown in the image above cannot be the same as the settings for the W3TC plugin on other websites, nor can it be the same as Object Cache The settings are the same as in the plugin.
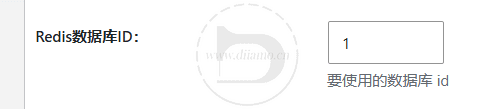
For example, in the configuration of the Object Cache Pro plugin on this site, if you are using a database with the ID “0,” you should not enter “0” in the “Redis Database ID” field shown in the image above; we recommend entering “1” instead.
If another website, Website B, on the same server also uses Object Cache Pro and W3TC, then in the Object Cache Pro plugin configuration for Website B, you must select database number “2,” and in its W3TC plugin, enter “3” in the “Redis Database ID” field shown in the figure above. And so on.
The dashboard widget does not display "Response Times" and "Requests"
The "Response Times" and "Requests" metrics are typically displayed below the dashboard widgets in the image below. Xiao Di noticed that after W3TC switched to using Redis for page caching, these two metrics no longer appear on the dashboard. Enabling certain Redis configurations can also cause them to disappear.
This is normal; just ignore it. If you really need to view this data, go to the plugin’s Dashboard page, click “Show Options” in the upper-right corner, and check the boxes next to the items you want to see—they’ll then be displayed.
Dashboard page↓.