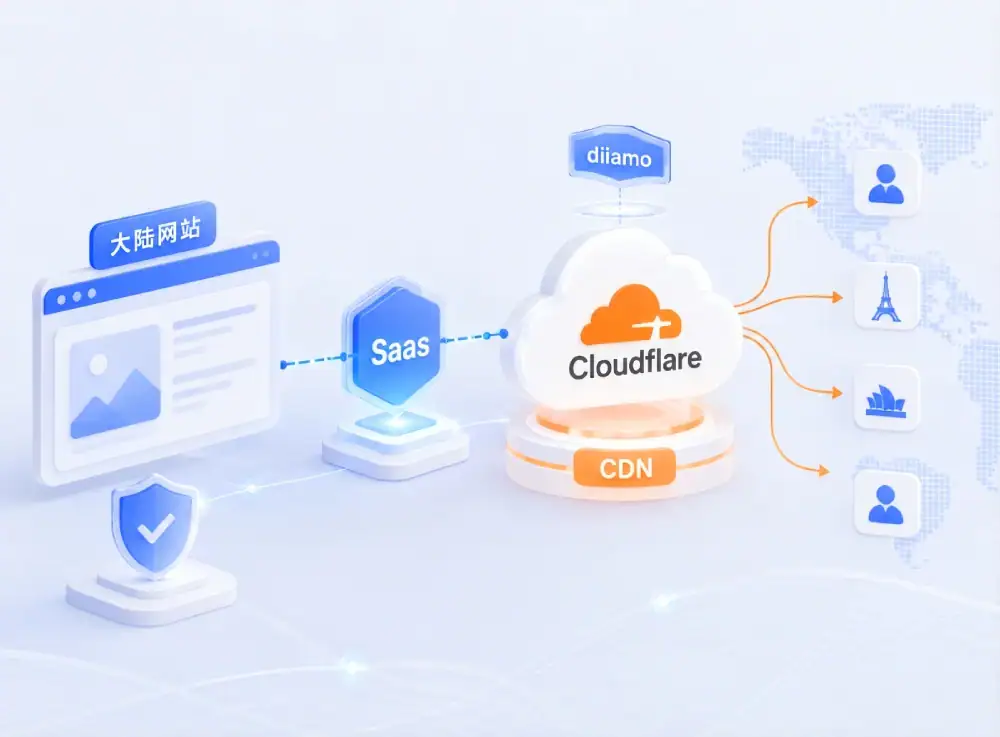
This article provides a detailed explanation of how to connect a website to CloudFlare (CF) via a SaaS link, as well as how to implement smart traffic routing so that users in mainland China bypass the CF CDN, allowing the server to obtain their actual user IDs.
This method is suitable for: Web hosting atMainland, so that visitors from Hong Kong, Macau, Taiwan, and overseas are routed through the Cloudflare CDN, while visitors from mainland China are not (direct connection). You can also choose to additionally bind a domestic CDN (such as EdgeOne) so that visitors from mainland China are routed through the domestic CDN.
Also applies to: Web hosting atHong Kong... while catering to both international and mainland visitors. This setup ensures that visitors from Hong Kong, Macau, Taiwan, and overseas access the site via the Cloudflare CDN, while mainland visitors access it directly (without going through the Cloudflare CDN).
Note: If your website is hosted in Hong Kong, you cannot register it with the authorities, so you cannot use a domestic CDN.
We’ve kept this tutorial as brief as possible, but we couldn’t omit any essential information. Please read through it carefully and follow the instructions step by step.
In the past, it was very convenient to connect to CloudFlare using a CNAME record. However, due to widespread abuse, CloudFlare has now disabled CNAME connections for new websites on its official website. This website, Xiaodi, is located at www.diiamo.cn原本通过CNAME方式绑定了CF.
Due to a technical glitch, Xiao Di had to temporarily disconnect the binding, and right around that time, Cloudflare happened to ban new sites from using CNAME bindings... It was incredibly frustrating. For several years, this site couldn’t be bound to Cloudflare, but later, the practice of binding via SaaS began to gain traction.
Xiao Di had tried integrating SaaS before, but the connection failed. Online tutorials tend to be incomplete, leaving out key details, and some even contain errors. Surprisingly, I couldn’t find a single comprehensive, detailed tutorial on integrating SaaS with CF that clearly explains how to automatically clear the cache and retrieve the visitor’s real IP address.
I recently came across a fairly detailed tutorial on integrating SaaS with Cloudflare, and with the help of AI, I finally managed to get it working—and even resolved a few issues along the way. Xiao Di spent two days writing this article to help everyone take advantage of Cloudflare’s benefits.
What are the benefits of connecting to CloudFlare CDN via SaaS?
There are many benefits to using CloudFlare CDN (CF) for websites in mainland China.
Benefit 1:Users outside mainland China can use CDN acceleration for free to improve page load speeds and SEO performance, among other benefits;
Although mainland websites are primarily aimed at domestic users, many of their target users rely on search engines like Google, and there may even be some customers in Hong Kong, Macau, Taiwan, and overseas. Accessing the website via CloudFlare from outside mainland China results in faster loading speeds. This also allows search engines like Google and AI-based crawlers to index content more smoothly, which helps improve the website’s SEO and GEO performance.
Some target customers use foreign AI search engines, and some webmasters may use foreign tools (such as Ahrefs) to analyze websites. Linking to Cloudflare can improve the success rate of foreign AI and certain foreign tools in crawling websites.
Benefit 2: CloudFlare CDN offers a powerful free firewall that significantly enhances website security.
Our Diiamo website, www.diiamo.cn主要面向大陆用户, naturally attracts a lot of traffic from overseas, including a large number of malicious bot visits and attacks. In particular, we’ve had to deal with spam comments and scanner bots, and Xiao Di has already manually blocked tens of thousands of IP addresses.
CloudFlare offers a powerful free firewall that supports highly customizable rules. It works exceptionally well at blocking a large volume of malicious traffic from overseas, reducing the load on your server and eliminating annoying spam comments, while also enhancing security.
How do I connect CloudFlare via SaaS?
If your website connects to CloudFlare via SaaS, please first ensure you have the following ready:
1)Sign up for oneCloudFlareYou’ll need to create an account and link a payment method, such as a credit card, to use the free SaaS (custom hosting) features. For a registration guide, please search Google;
2) Mainland Website A (the website that needs to use CloudFlare for acceleration) must useinternal (a country)With smart DNS resolution (allowing you to set different DNS records for different regions)Domain Name Resolution Service;.
You can use DNS services from major providers such as Alibaba Cloud, Huawei Cloud, and Tencent Cloud (DNSPod). However, Baota's DNS service is not compatible, as it lacks intelligent DNS resolution capabilities.
We strongly recommend using the "www" version for this website's domain. If it currently does not include "www," I suggest you change it to the "www" version immediately; otherwise, you'll run into a lot of problems down the road.
If domain A is registered on an overseas platform, we recommend transferring it for free toDNSPodPlatforms like that—if you don't want to migrate, you canJust change it toUse a domain name resolution service such as DNSPod.
3) You’ll need to use a separate domain (Domain B) and connect it to CloudFlare by modifying the NS records (please search Google for specific instructions); there are no requirements regarding Domain B’s extension, and visitors won’t see it. You can register a new, inexpensive domain directly through CloudFlare (please search Google for specific instructions)—it’s quick and easy.
Xiao Mo can't go into great detail for every single step, so please figure out on your own the things that are very simple or can be easily found by Googling or asking an AI.
Link to the tutorial:
1- You need a website A that has already been set up, is accessible via its official domain name, and has an SSL certificate installed. A link is not required; any other domestic CDN will work. Assume the domain name for website A is www.diiamo.cn;.
Note: At this point, Website A’s DNS settings contain an A or CNAME (for CDN) record pointing to the server. Step 6 below will explain that you need to change the location of this record to “within China.”
We strongly recommend that domestic websites use the "www" domain format as their primary domain. If a root domain without "www" is used, compatibility will be significantly poorer, which may lead to numerous issues down the line—for example, a root domain without "www" cannot be used simultaneously with corporate email and CDN acceleration.
2. First, bind the secondary domain to CloudFlare by modifying the NS records. There are plenty of tutorials online for this, and it’s quite simple, so I won’t go into detail. Let’s assume the secondary domain B is diiamo.org;.
3- In CF, add a subdomain for the auxiliary domain and use an A record to bind it to the website's A server IP (as shown in the figure below). Let's assume the subdomain is todiiamocn.diiamo.org;.

4- Go to the “Custom Host” section in CF↓, andFallback sourceEnter the subdomain you created above todiiamocn.diiamo.org. Then click “Add Custom Hostname” and enter the domain name for Website Awww.diiamo.cn.
We strongly recommend using the "www" version for this website's domain. If your current domain does not include "www," we suggest changing it to the "www" version immediately before proceeding; otherwise, you may encounter numerous issues down the line.
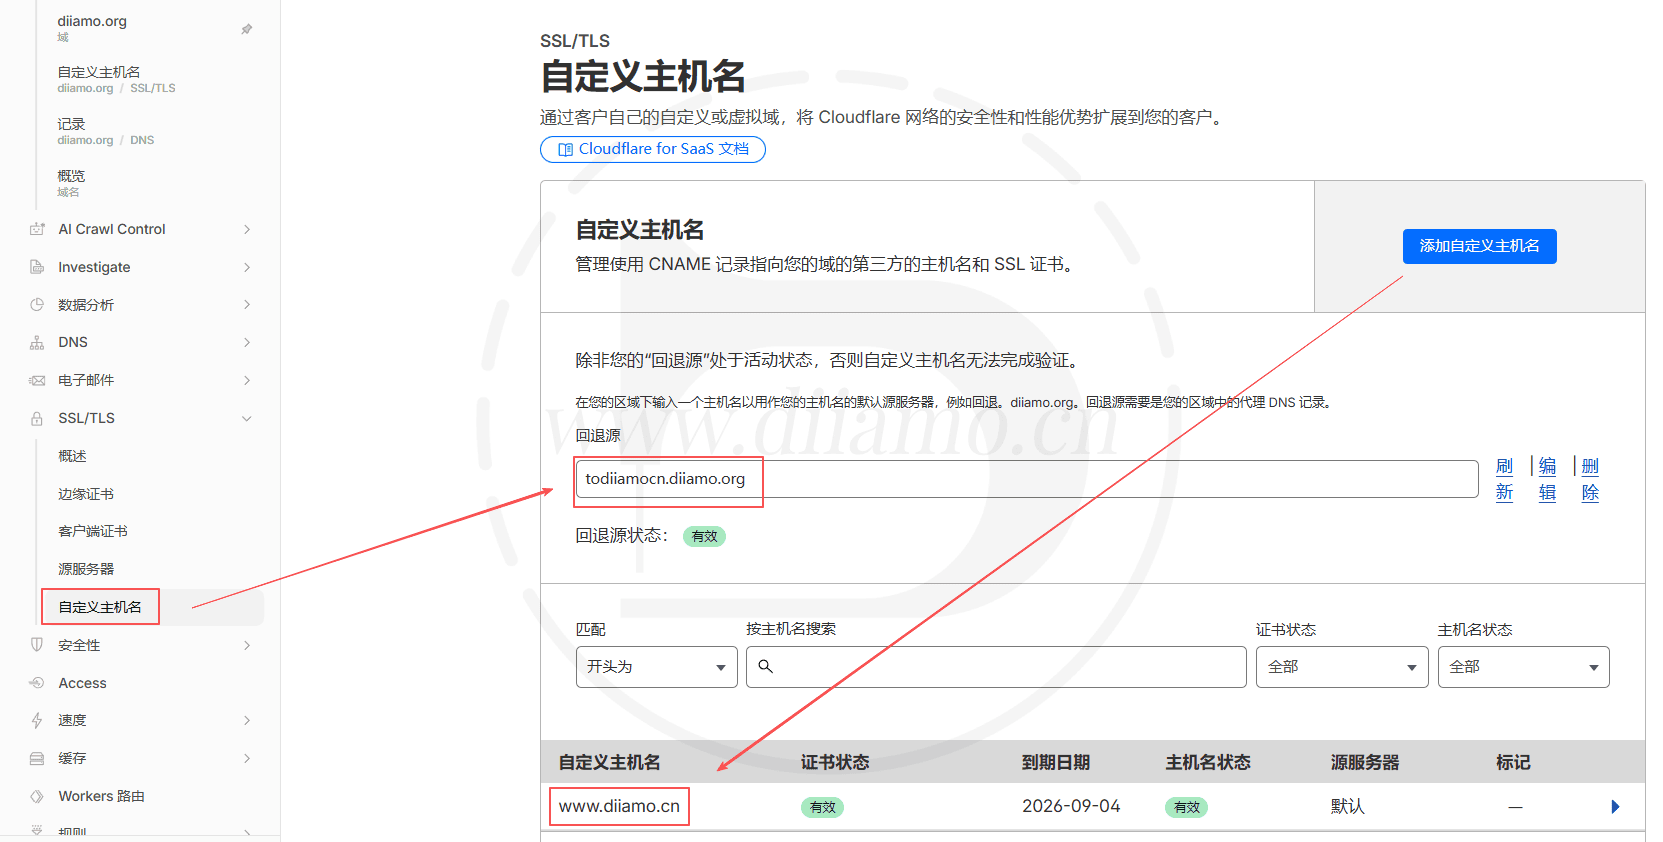
Note: You need to add three TXT records below. Be sure to remove the root domain from the “Host Record/Name” field for the changes to take effect, as DNS services like Dnspod automatically append the root domain suffix. For example, the TXT record required by Cloudflare has a “Host Record/Name” of “_acme-challenge.www.diiamo.cn” (diiamo.cn is the root domain); when adding a record, remove the root domain from the “Host Record/Name” field so that it becomes “_acme-challenge.www” (Be sure to remove the period after “www”), and fill in the information as shown in the image below.
After adding a custom hostname, you will be prompted to add a TXT record (see the image belowRed box), go to the page for adding DNS records for Domain A (As mentioned above, you must use a domestic DNS service that supports smart resolution.) Just add it there and select “Default” for the route.
A short while after adding (anywhere from a few dozen seconds to a few minutes), refreshing the page will show two new TXT records (see image belowBlue box), add them as shown in the figure, and select “Default” for the route. It’s okay if the two TXT records have the same name—just add them as is. If there’s a conflict, change the resolution route for one of them to “Overseas.”
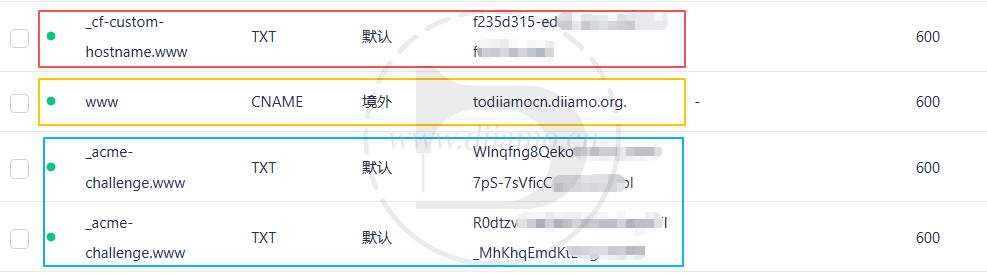
5- Once the above DNS records take effect, you’ll need to add an additional CANME record (see the image aboveYellow box) to the CF fallback source (todiiamocn.diiamo.org), be sure to select “Overseas” for the route.
6- Next, before proceeding... www.diiamo.cn Change the A or CNAME record for the linked website to “internal (a country, province, city etc)”, This change is very simple; I won't go into detail—just go ahead and make the change yourself.

This concludes the process of linking CloudFlare via SaaS. If everything went smoothly, your website should now be successfully linked to CloudFlare via SaaS. Traffic from outside mainland China (including Hong Kong, Macau, and Taiwan) will be routed through the CF CDN, while traffic from within mainland China will not. Follow the steps below to verify if the configuration is working.
How to Tell if Your Website Is Successfully Connected to CloudFlare
Use the following method to determine whether a website accessed from outside China is routed through the Cloudflare CDN.
1- Open and launch your VPN software (internet access tool), and select “Global Mode” for the proxy settings ↓.


2. When selecting a server location for your VPN, choose another country—preferably the United States.
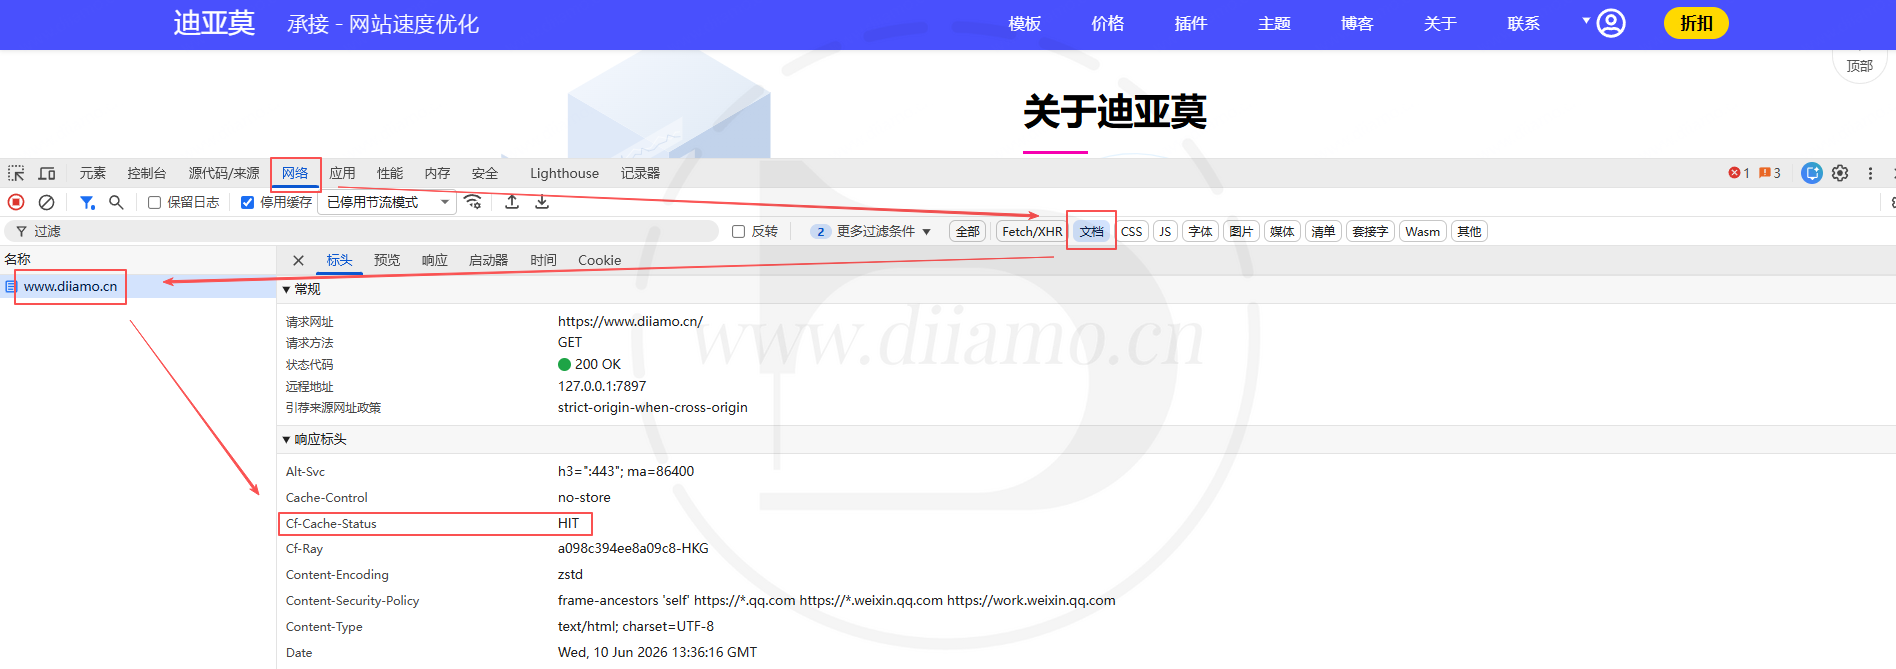
3- Open your website, refresh the page a few times, press F12 to open the Developer Tools, and click “Network” > “Document” > “URL” in that order to view the contents of the “Response Headers” collapsible section.
If “cf-cache-status” or “cf-ray” is displayed, it indicates that the connection to CloudFlare was successful. By default, CloudFlare does not cache HTML, so the message “cf-cache-status BYPASS/ DYNAMIC” should normally be displayed.
Click the “Website Link: CloudFlare Automatically Clears the CDN Cache After Changes Are Made”By configuring the section settings, CF will cache the website's HTML, and the status will display as “cf-cache-status HIT”."
Note: The following tutorials are based on the BaoTower control panel. If you are using a different control panel, the methods and principles are the same—only the navigation paths differ. Simply ask the AI for guidance. If your control panel lacks a specific feature, ask the AI for alternative methods to achieve the same result.
Add CloudFlare's origin IP to the firewall whitelist
You need to add the CDN origin IP to your hosting firewall's whitelist so that the CDN can successfully retrieve page information from the origin server; otherwise, your website may experience issues.
Get the visitor's real IP address after linking to CF
By default, the website reads the CloudFlare origin IP as the visitor's IP. In this case, the firewall cannot function properly because the CloudFlare origin IP has already been added to the firewall's whitelist, soMalicious behaviorIt's almost impossible to intercept, which makes it very dangerous.
Features such as web application firewalls, CC attack protection, and IP blacklists/whitelists rely on accurate visitor IP addresses to function properly. If the underlying system cannot obtain the real IP address, the firewall may mistakenly identify the CDN’s IP as an attacker, or it may allow the actual attacker through by mistaking them for a CDN node.
It can also cause many of the website's features to malfunction, so the website needs to be able to identify which IP addresses belong to real visitors.
Enable Baota Panel to log visitors' real IP addresses
First, you need to configure the Baota Panel to ensure that logs record visitors' actual IP addresses. There are two scenarios here: one is using only CloudFlare, and the other is using a dual CDN setup—for example, similar to the Xiaodi website (www.diiamo.cn), where traffic from outside mainland China goes through CloudFlare, while traffic from within mainland China goes through EdgeOne.
Based on your situation, select one of the followingOne of themJust follow the instructions.
Use only CloudFlare (single CDN) – to log visitors' real IP addresses
By default, the website uses CloudFlare's origin IP as the visitor's IP. This prevents the firewall from functioning properly, since CloudFlare's origin IP has already been added to the firewall's whitelist, meaning that virtually no visitor activity will be blocked.
Use Dual CDN - Log Visitors' Actual IP Addresses
If, like the XiaoDi website (www.diiamo.cn), you want traffic from outside mainland China to go through CloudFlare and traffic from within mainland China to go through EdgeOne, special configuration is required.
How to configure Nginx to obtain visitors' real IP addresses
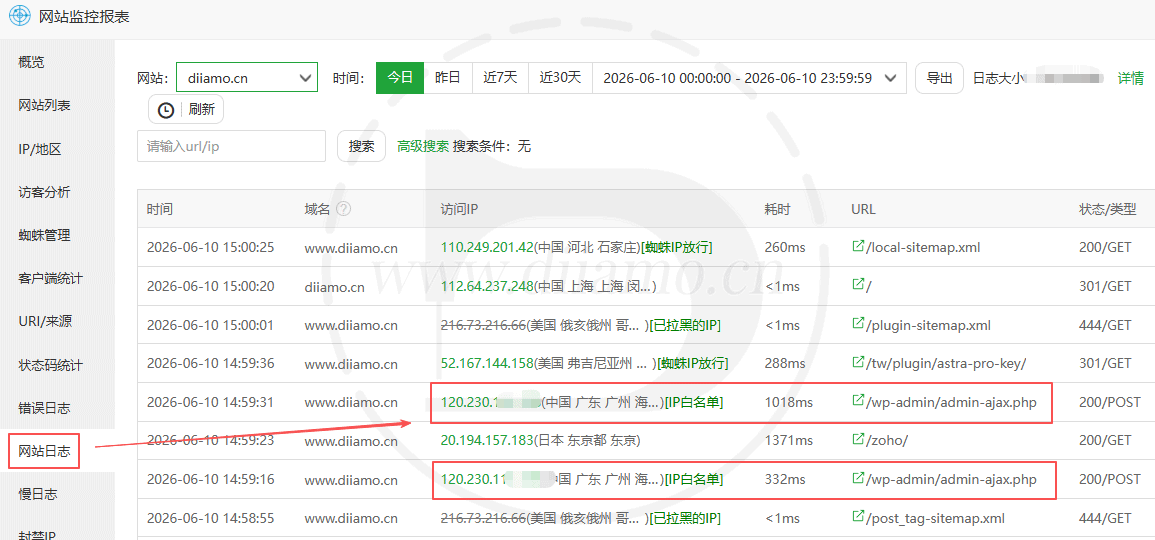
Once you're done, be sure to check the website's traffic to see if there are any unusual visits and whether the logs contain only genuine customer IP addresses. For specific instructions on how to do this, ask an AI or similar tool.
You can check the BaoTower website access logs, BaoTower monitoring reports (available in the Professional edition and above), WordFence “Real-Time Traffic” records, and more. These all log visitor IP addresses and HTTP status codes (codes starting with 2 or 3 indicate a successful request, while those starting with 4 or 5 indicate a failed request).
Configure the Baota Nginx firewall to obtain visitors' real IP addresses
You must also configure the Baota Nginx firewall to capture visitors' real IP addresses for the blocking to take effect.
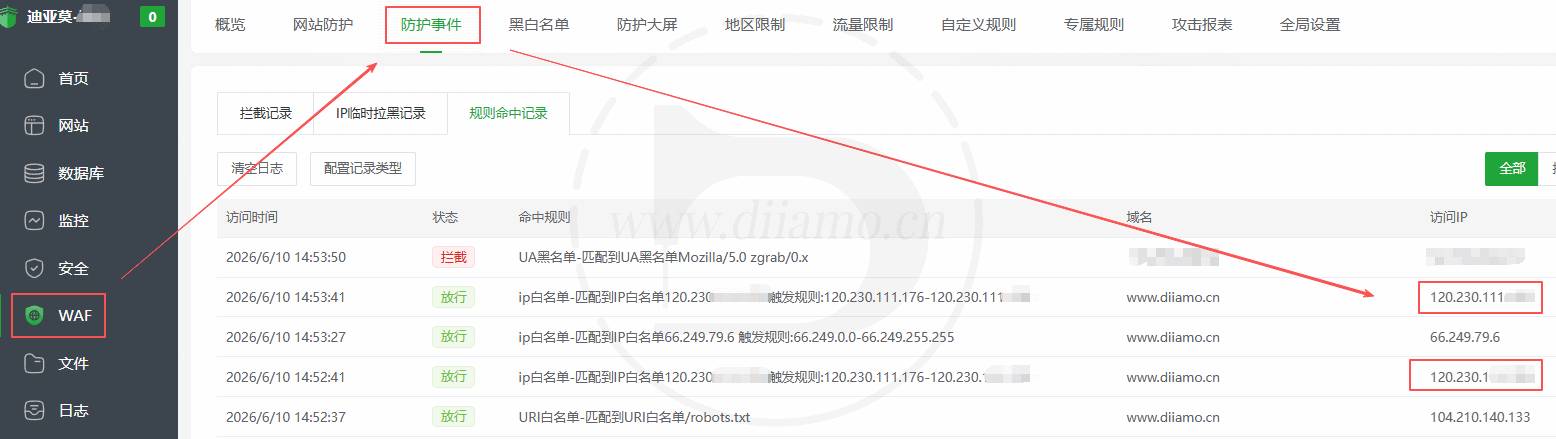
Conclusion:Add your IP address to the firewall's whitelist, then visit a few pages using your browser's incognito mode. Wait a moment, then check under WAF > “Protection Events” to see if your actual IP address is logged there. If it is, you're good to go.
Configure monitoring reports to obtain visitors' real IP addresses
The paid version of Baota Panel is available for free Monitoring Reports Features↓.
Conclusion:Visit or interact with a few pages yourself, wait a moment, and then check the monitoring reports to see if your actual IP address is recorded there. If it is, you're all set.
WordFence Settings: Retrieving Visitors' Real IP Addresses
You also need to configure the WordFence plugin to use the appropriate method for obtaining visitors' real IP addresses so that the WordFence firewall can function properly.
How to Automatically Clear the CF CDN Cache and Cached HTML
The website needs to be connected to CloudFlare via a plugin in order to automatically refresh the CloudFlare CDN cache whenever the website content is updated. Most plugins do not support websites integrated via SaaS, but Xiao Di found one that does.
How to configure CF caching rules for a website that uses multiple caching plugins and has e-commerce functionality
The XiaoDi website (www.diiamo.cn) offers registration and purchase features. To ensure that users see their logged-in status and content immediately after logging in, I disabled the HTML browser caching feature in the W3TC Caching plugin.
This causes Cloudflare to not cache HTML, as the caching functionality is affected by W3TC. In this case, you’ll need to manually adjust Cloudflare’s caching rules to enable the CDN to cache HTML.
Frequently Asked Questions and Common Mistakes
A single CDN setup is relatively straightforward; just follow the steps above, and you should be good to go. I haven’t encountered any issues so far. A dual CDN setup is much more complex, but by following the tutorial above, I’ve managed to avoid most pitfalls, and it’s running smoothly.
If you have purchased our tutorial, or if you are a customer with an annual subscription or higher and are experiencing issues this week, please feel free to contact our WeChat customer service for assistance.
Error 554 occurred while saving the article/product; saving failed due to excessive processing time.
When saving articles or products, the following error message sometimes appears ↓: “This page cannot be displayed. HTTP ERROR 554.” Refreshing the page resolves the issue, and a message confirming successful saving appears.

Issues with functions such as logging in and making purchases
After linking the Xiao Di website to CF, the login function was malfunctioning at first, but after looking into it, the solution turned out to be quite simple.
After connecting to the CF CDN, access speeds have slowed in Hong Kong, Taiwan, and Macau
The image failed to load; the image compression plugin reported that it could not connect to the server.
This is an issue Xiao Di encountered himself; some users have reported that images are failing to load on the Diiamo official website (www.diiamo.cn). Coincidentally, images newly uploaded over the past two days failed to compress using ShortPixel, with an error message stating that a connection to our server could not be established.