
Mallory, I'm in theExcellent foreign trade hosting review recommendationThe article "TheChemiCloudIt is a very good LiteSpeed host, fast, stable, customer service support is very good, very suitable for building small and medium-sized foreign trade independent station, cross-border e-commerce site. Write this ChemiCloud hosting purchase tutorial to help you quickly buy hosting.
Tip: ChemiCloud hosting with Imunify 360 antivirus will automatically disable the GPL version of the Elementor Pro plugin, which requires the original version. Buy through our invitation link free to help you activate 1 yearGenuine Elementor ProThe second year of activation starts at half price (35/$) for sites on the same host.
Based on Diiamo's years of experience using ChemiCloud and feedback from numerous users, ChemiCloud outperforms SiteGround and Hostinger in terms of performance, speed, and stability. Check it out 👉SiteGround Disadvantages👉Hostinger Disadvantages.
Update 2025.10.28: A SiteGround user gave feedback that the site was shut down, affecting Google ads, and SG customer service said it was CPU overuse. In this case, Hostinger will shut down the site as well. However, ChemiCloud will not, but will briefly and temporarily restrict the IP that has too much access to continue to visit, so as to maintain resource balance, much more humane.
Updated November 20, 2025: ChemiCloud’s Turbo WordPress hosting plan has increased its RAM from 3 GB to 6 GB! The price remains the same. SiteGround and Hostinger offer plans in the same tier at a higher price, but their RAM is less than 3 GB.
Many of our website builders are using this server, and a number of our website builders group members have purchased it on our recommendation, with good results and reputation. The picture below is the chat record of our recommendation ChemiCloud to group members.
His SiteGround (SG) server has 2 months left to expire, the renewal fee is expensive, plus the mobile speed of the SG website is too slow, so he plans to change the server. On Di's recommendation, he purchased a ChemiCloud server with a Black Friday discount of $36 + 2 months of free time.
I helped him migrate his website and email to ChemiCloud for free, enabled Redis object caching, installed an SSL certificate, set up the Cloudflare CDN, and linked a caching plugin. He hasn't used it yet.Perfmatters PluginWith optimized images, JS, and CSS, the site loads incredibly fast!


Just relocated site, only optimized for CDN, total load time on Google speed test 1 Seconds↓:

After initial optimization, Google speed test total load time 0.7 Seconds↓:

Dee was featured in theHigh-speed and stable foreign trade hosting recommendationsThe article shared a website speed optimization experience: the customer used SiteGround server + FlyingPress caching plugin + FlyingPress CDN ($5/month), the mobile speed can not be optimized, Google test scores are very low, the following left figure.
Later, they took my advice and switched to ChemiCloud Hosting, using the free LiteSpeed Cache caching plugin + free CloudFlare CDN, optimized for mobile speeds on the fly, pictured right below.


ChemiCloud is a perfect alternative to hosting providers like SiteGround, Hostinger, A2 Hosting, and NameHero. Based on our own testing, we found that ChemiCloud offers better performance, speed, and service—especially since its control panel is very smooth to use.
This ChemiCloud Hosting Purchase Tutorial is written to help you easily purchase a ChemiCloud server as well as setup and optimize it, the signup process is expected to take 7 minutes to complete. From the server merchant45 days full refund without reasonNo worries.
Sign up + buy a server through our invitation link, and get our free WeChat customer service (QR code in footer) for one-on-one consulting services when you encounter server or website problems, as well as the benefits mentioned below.


ChemiCloud Hosting Benefits
Bottom line: lower price, faster, more stable, better online customer service than SiteGround, Hostinger hosting. The downside is the use of Cpanle, a lot of features are very full, some people will find it complicated, not as simple as the panels of those 2.
- Cpanel, LiteSpeed system, NVME hard disk, better, faster, stronger than SiteGround, Hostinger;
- Online customer service returns in seconds, even if WordPress or plugin conflicts and other non-hosting issues are willing to deal with, timely + real problem solving;
- High configuration, loose restrictions, not so easy to lag, faster and more stable website, you can also upgrade the hosting configuration and so on.
- There are temporary domain names, email addresses, free website relocation, and more;
- Deeply optimized WordPress firewall, the success rate of blocking malicious crawlers and visits is greatly improved. With automatic antivirus and WP source file comparison + one-click recovery function.
- Deep optimization of WordPress, one-click use of the system Cron instead of Wp Cron, smart updates, copy debugging and more.
- Redis + Memcached features;
- It works even better than the paid version of Pagoda! Plus, it's more convenient, hassle-free, and super affordable.
Updated 2025.11.20:ChemiCloud's WordPress Hosting"WordPress Turbo" The package memory went up from 3G to 6G for free! The price stayed the same. SiteGround and Hostinger are more expensive for the same class of package, yet the memory is less than 3G.
SiteGround, Hostinger customer service response is slow, non-hosting problems will not help deal with, so that the user to see their own information. ChemiCloud customer service, no matter what the problem, will help users deal with. Once Woocommerce settings can not be saved, customer service also help me deal with, found that the plug-in conflict.
SiteGround and Hostinger are 2 servers with tighter performance limitations, and they don't give as much kernel and CPU as ChemiCloud, so they are prone to lag. Di seldom gets stuck with ChemiCloud, its third Turbo package has 3*CPU and 3G RAM. In contrast, SiteGround and Hostinger have only 2*CPU and 2G RAM in the same package, but the price is higher.
ChemiCloud UsageCpanel panelsSiteGround, Hostinger are 2 companies that use their own developed panels in order to save money and have very few features.
ChemiCloud is also far ahead in terms of firewall, the following picture is the optimization function that comes with it, which is very practical. It also has a "WordPress Integrity" check and recovery feature, which allows you to remove viruses and recover critical system files in one click if your website is hacked. I haven't seen these features in any of its branded shared servers.

Sign up for thanks via the invite link
Through ourInvitation LinksWhen you buy a server, we get a commission and as a thank you we will give you the following support.Note: Please think carefully if this hosting fits your business and budget!, don't buy it just because you have a thank you!
The support below is a way for us to thank you for your trust, not to induce you to buy this hosting. Di hopes that your purchase is because this hosting is helpful to your business and can be renewed for a long time if it works well.
- Relocate a website for free;
- Choose any one on our website Theme or Plugin, free gift to your account;
- Within 30 days of purchase, usethis hostBuild a website encountered any problems, free one-on-one manual professional answers;
- Free speed audit, slow speed after using this host contact our microsoft customer service, help you analyze the reasons to give advice;
Cooperative Extension:Send our invitation link (https://www.diiamo.cn/chemicloud) to a friend. After successful registration and purchase, both you and your friend can get the above mentioned thanks for free. For more details, contact WeChat Customer Service (code in footer).
Tip: The merchant does not calculate our commission if you request a refund/return after the purchase is completed and then re-purchase a new host. Only the first time you pay for a purchase, you need to register a new account and re-purchase in order to get the commission.
Tip: If you add to cart, don't pay for it, and then purchase a second host and complete the payment, only the payment for the first host counts as a commission, not the second. There is no commission if you do not pay for the first host.
No coupons, direct purchase via invitation link
I asked the hosting customer service and there are no coupons! Don't believe the coupons on top of Google! Hosting customer service told me that online coupons are fake and will not lower the price, but will only count referrals (commissions) under the name of the coupon issuer for the purpose of stealing commissions.
Just buy directly through our invitation link, it's already the best price, no need to enter a coupon.
One user purchased through our invite link, then found a coupon online for his own purchase, which made the price higher instead, and didn't credit us for the referral. He ended up registering a new account and reusing ourInvitation LinksThe purchase price was only reduced and received our thanks above.
Diiamo has communicated with the hosting provider, the other party can specifically for us to generate a 5 ~ 10 U.S. dollars coupon, in the preferential price to further reduce the price, the difference directly from the small Di commission deducted inside. However, the other side said that this function is still in development, development and then generate coupons for us.
ChemiCloud Hosting Purchase Tutorial
Tip: It's best to open the ladder software first, it will load much faster. Especially if the icon and appearance are not displayed fully, it is more important to open it. If there is an abnormality when you open the ladder to go over the wall, close it.
Tip: Just follow the steps, there are account registration steps in the middle process. Support credit card and Paypal payment. If not, proceed to the followingPaymentsThe steps will save the order information, get a friend to pay on your behalf and then continue to follow the steps to pay on the line.
First, click the big button below to enter the ChemiCloud official website, and you can get our promised benefit feedback after successfully registering and purchasing.
After successfully registering through our invitation link, the server merchant will send us the following email with the order number and server IP. after successful purchase, please send the order number or server IP address to WeChat customer service (QR code in the footer) to check for the rebate.

Choose the right package
Which package should I choose for ChemiCloud website building? Only put 1-3 foreign trade websites, blogs, it is recommended to choose the red box below "WordPress Hosting", this is shared hosting, very cost-effective and fully meets the needs of the vast majority of small and medium-sized websites.

If you have a generous budget, a high-traffic website, and demand high speed and performance, we recommend choosing the option shown in the image above.“Managed Hosting”. This is a managed hosting service, which offers significant improvements in performance, security, stability, and speed."
For annual payment, the lowest plan costs $7.50 per month for 1TB of storage.It's a great deal! However, it only supports one website, and the disk space is limited (though sufficient). You can opt for a more expensive plan.
We've come across some sites built with Elementor + Woocommerce + some Ele extension plugins, using a lot of Tabs widgets, and the site is code heavy."WordPress Hosting" May not be effective to use "Managed Hosting"Fits better.
Next choose a hosting package. Buy"WordPress Hosting" Host words.Suggested selection "WordPress Turbo” Package. Buy 3 years at once for the best price ratio. courtesy of ChemiCloud 45 days full refund without reason Commitment, no worries.
Updated 2025.11.20:ChemiCloud's WordPress Hosting"WordPress Turbo" The plan’s storage has been upgraded from 3 GB to 6 GB for free! The price remains the same. SiteGround and Hostinger are in the same tier, but their plans are more expensive and offer less than 3 GB of storage.
Whether it's SiteGround, Hostinger, or ChemiCloud, all shared hosting plans are only cheap the first time you sign up—renewal prices are several times higher—so you'll need to switch to a new server when your plan expires. Try to purchase the longest-term plan available to avoid the hassle of frequently switching servers.
According toResource utilization policy,"WordPress Turbo" The package has the best performance, about 3 cores and 3G RAM, and has automatic virus detection, removal, and better security.
"WordPress Pro" Package performance is about 2 cores 2G RAM, 3 years price ratio "WordPress Turbo" Cheap at $36. If you're on a tight budget, go with this one.

The lower right corner of that server room location (Singapore) is based on your IP address is automatically recommended near, the following registration process can be re-selected server room location, so do not worry, ignore it.

If you buy."Managed Hosting”Web hosting, 1 website host, 20 GB of disk space, paid annually, per month"20.83U.S. dollars.3 website hosting plans, 30 GB of disk space, billed monthly with annual payment37.50US dollars, a great deal.


Binding Domain Name
Select "I already have a domain"Enter the prefix and suffix of the domain name (it doesn't matter if the domain name is already bound to another website), and click "Use" button. Some domain name suffixes are not supported, you will be prompted "The domain you entered is not valid", enter it directly into thecomJust contact the online hosting customer service to change it after you buy it.
Although free to send a year domain name, Xiaodi does not recommend coveting this small advantage, because the late renewal is expensive! And the domain name of the hosting provider does not have many features, the late server deactivation of this domain name is not good to deal with. Recommended to goNameSilo Domain Name Registration.

Some domain suffixes are not supported, prompting "The domain you entered is not valid" ↓.direct inputcomJust contact online customer service to change it after you buy it.

Select Server Room Location & Purchase Add-ons
The package information will be displayed at the top and the price on the right.The price of $142.20 in the screenshot below is a Black Friday deal, so it's lower, and the price should be around $161.64 for a normal purchase.

If you buy Managed Hosting (MWH) hosting, there is no following server room and configuration options (uniformly use US server room). Because MWH hosting comes with enterprise-level CDN, website content is cached in the cloud, and the server TTFB is very fast, so it doesn't matter where the server room is located, the global access is fast.
"Server Location”Choose the data center closest to your target audience. If you choose the U.S., we recommend “Portland” on the West Coast, as it offers faster access speeds from within China. “Washington, D.C.” is located on the East Coast. If your business primarily serves Southeast Asia (the Philippines, Vietnam, Malaysia, etc.), we recommend the Singapore data center."
If you purchase “Managed Hosting,” you cannot select a location; it defaults to a U.S. data center. Since “Managed Hosting” includes complimentary enterprise-grade full-cache CDN, all resources are distributed globally to various locations, ensuring fast access speeds. The physical location of the data center has minimal impact on access speed.

"Available Addons" Just keep the defaults as shown below, no extra money to pay, does not affect use or functionality. Changing other options costs extra money and is not necessary.
Update 2025.03.23: Some users have reported that the "Free Let's Encrypt SSL" free certificate option is gone, and has become "None". Actually it is there, just in a different form, just select "None". You can install the free auto-renewal certificate after creating your website, there is a tutorial for installing free SSL certificate below.

"Additional Services" Save the defaults as shown below and don't check the boxes! It's expensive, unnecessary, and you can buy the 2 services below at a later date.

Join our mailing list↓ is the meaning of subscription, after checking the box will receive some marketing e-mail hosting business, it is recommended to uncheck the box.

Finally, click the orange "Continue" button on the right. Since it's Black Friday, you'll get a discount on the total price and 2 months of free time.

Create an account
The top of the interface will show the following, Promotion No need to fill it out, the discount has been applied automatically and it is already the lowest price. I'm in the process of applying a $5 off coupon with ChemiCloud (haven't gotten it right yet) to really lower the price. The discount is deducted from the Diiamo commission, so it's like we're paying $5 for you, which is not a huge amount, but a small token of our appreciation.
There was a user who googled coupons on their own, filled out the coupon and found out it was more expensive and didn't count our referrals as no commission and couldn't get the benefits/thanks mentioned above. Host customer service told me the online ones are fake coupons that don't lower the price and only credit the referral (commission) to someone else, which is scamming + theft.
The tutorials are frequently updated to ensure a consistent registration process, so some screenshots will not match the prices, just ignore them. Buy Turbo 3 years for ≈ $142.20 on Black Friday, and ≈ $161.64 on weekdays.

按下图提示填写↓。尽量refrain fromUsing QQ email to register, the registration may not be successful. A foreign host customer service told me that QQ email is often used for bad things, so it will be controlled and restricted.
We usually register open ladder + use 163 mailboxes and other ordinary mailboxes can register successfully. Some people may network complexity is misjudged malicious access, may need to ladder open global + use enterprise mailbox to register successfully.

Please be sure to double check the email address!!!! You may keep failing to log in after registering your account with the wrong email address, and you can't find the reason for it.

"Payment Method”, payment is only supported by credit card and PAYPAl. no matter how you intend to pay, no matter if you have paypal or not, no matter if the universe is destroyed tomorrow or not.Please make sure to select “Paypal”!
This way, you can complete the account registration first, and then you can still pay by credit card in the next payment link. It also prevents you from having to fill in the wrong credit card information or automatically refreshing the page, which may cause you to have to fill in the information again. If you choose “Paypal”, you can register your account first and then pay, which is much more stable!

Join our mailing list is the meaning of subscription, after checking the box, you will receive some promotional emails from hosting merchants, it is recommended to uncheck the box.
Check the consent box at the bottom right ↓.

Finally, tap the orange "Checkout" button ↓.
Prompt order success ↓, need to pay. Click on the red box "Continue To Client Area" button to make payment. If you register through our invitation link, please send a screenshot of the screen below (with Order Placed number) to WeChat Customer Service (code in the footer) to get the benefits.

Sometimes you may see the box below, this is the guide, click "Skip Tour" to skip it temporarily. Click "Skip Tour" to skip it temporarily. Complete the purchase first and check the guide later.

Payments
After following the steps above, you will be taken to the host's Dashboard dashboard and prompted with an unpaid bill, click on the big red number 1 to view the bill payment. Or click "Billing" on the left side to enter the billing page.

After entering the "Billing" account screen shown below, click "Pay Now" button to make a payment.
Tip: Only support Paypla and credit card payment, if you don't have these payment tools can go to Taobao and so on to find someone to pay on behalf of the search Paypal or credit card payment on it. Please carefully screen Taobao store, it is recommended to look for store time and the number of orders.

Click Select Payment Method ↓ and follow the steps to complete the payment.

After completing the payment the following screen will be displayed ↓, click the red box button.

If you are interested in the guide, click the orange "Start Tour", if not, click "Skip Tour" to skip it. If you don't want to show this pop-up window again, check "Do not show this again" at the bottom left corner, then click "End Tour" in purple color at the bottom right corner.
This concludes the ChemiCloud hosting purchase tutorial, the next step is to resolve the domain name to the server and you will be able to access the website through the page.
The first place you should look for any problems with your website isHosting Customer Service, instead of looking for us!!! We are sometimes busy and slow to reply, we can't deal with many problems without your host's access, we can only give advice. Send the problem toHosting Customer ServiceIf you have a problem, an expert will help you in 3 seconds, and if it goes well, it will be solved in 1 minute.
View server IP address, nameserver, cPanel account, FTP account
After logging in to the server, tap the exclamation mark with a circle in the lower right corner of the server board (below) to bring up the server information and view the IP address. The domain name resolves to this IP address and you can access the server through the domain name.
In DashboardIf you click on the round exclamation mark button on the far right side of the host, it will bring up the information panel, in which you can view the IP address, Name Servers, Cpanel login information, and FTP login information.

Resolve Domain Binding Hosting
You must first link your domain to a web host before you can access your website via that domain. There are two ways to link a domain to a web host. We recommend using Method 2, especially if you plan to use CloudFlare’s free CDN.
Method 1: Configure/Use the Host's DNS Name Resolution Service↓:
To modify your domain's NS resolution, change it to the three entries highlighted in red in the image below (refer to the previous section for where to find your Name Servers). This will switch to the host's domain name resolution system, automatically binding your domain. As for how to change your domain's DNS, simply search online, contact your domain registrar's support, or even ask an AI—it's a straightforward process.

If you're using the hosting provider's DNS system and need to add MX records for email or similar settings later on, you'll need to do so through your hosting account. Click here to learn more 👉How to Add Domain Name Resolution for Hosts.
Note: If you switch to the host's domain DNS, any future domain name resolution changes (such as enabling corporate email) must be added on the host's side to take effect. Changes made at the domain registration site will not be effective.
Method 2: Add two A records to the domain to bind the host ↓:
We recommend using CloudFlare's free CDN. First, link your domain to CloudFlare, then configure the domain settings in CloudFlare and add two A records pointing to your website's IP address.
If you prefer not to use the host DNS as described above, you can instead bind the server by adding two A records for the domain. Simply add the two A records shown in the image below, pointing to the IP address. One record should be named @, and the other should be named www. The image below shows the configuration after adding the records in CloudFlare. Binding domain name resolution after the need to install SSL certificate, click to viewHow to Install an SSL Certificate.

Installing an SSL Certificate on a WordPress Hosting Account
After binding your domain name by following the steps above, we recommend installing a free SSL certificate first. Once you’ve created your website, you can access the admin panel directly via the URL to begin building your site.
Note: If you’re binding the host by changing the nameservers, you may need to wait a few hours for the changes to fully take effect before installing the SSL certificate. Otherwise, the installation will keep spinning indefinitely for several hours. If you encounter any issues, contact the hosting provider’s online customer service, and they’ll resolve the problem immediately.
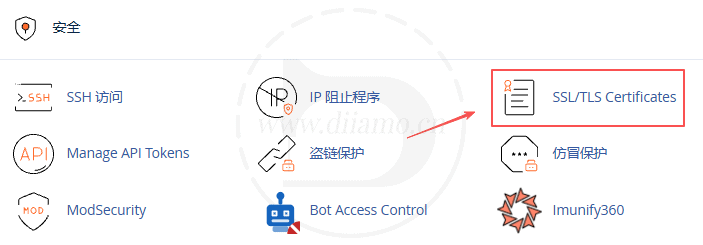
Log in to cPanel, go to the “Security” section shown in the image below, and locate and click “SSL/TLS Certificates.”
You'll be taken to the section shown below ↓. There are two ways to install an SSL certificate:Select one of the installation options. If you're using CloudFlare, we recommend selecting the “Install a custom certificate” method.
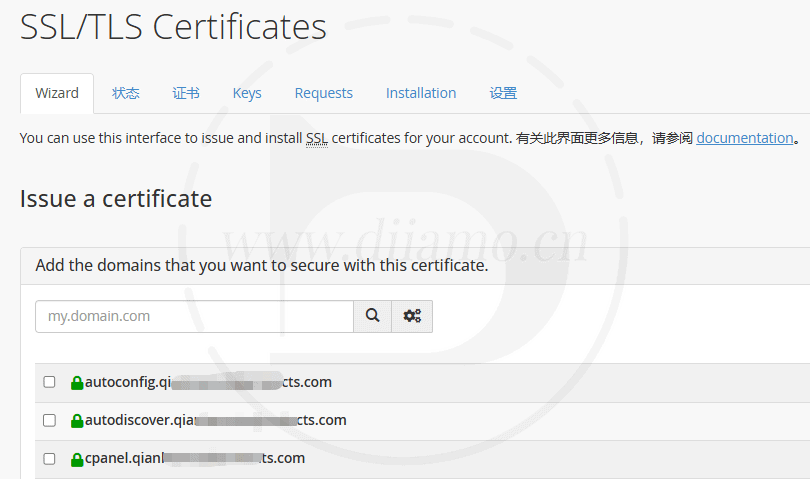
Install a Free Let’s Encrypt Certificate
The host provides free Let’s Encrypt certificates that are valid for 3 months and renew automatically upon expiration. This is the simplest and easiest installation method.
Note: If you are using the Cloudflare CDN (domain name resolution), you must first disable the two orange cloud icons next to the A records and wait until the SSL certificate is installed before re-enabling them; otherwise, the SSL certificate application will fail.
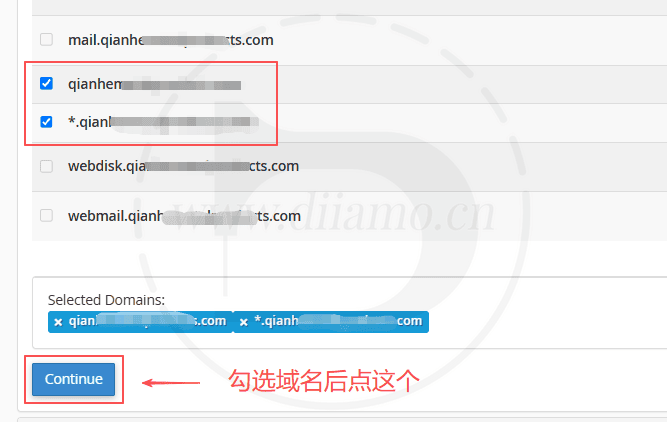
In the image below, check the domains for which you want to install the certificate. If the server is bound to only one domain, select all items; if there are multiple domains, select only the items containing the target domain shown in the image, and then click “Continue.”
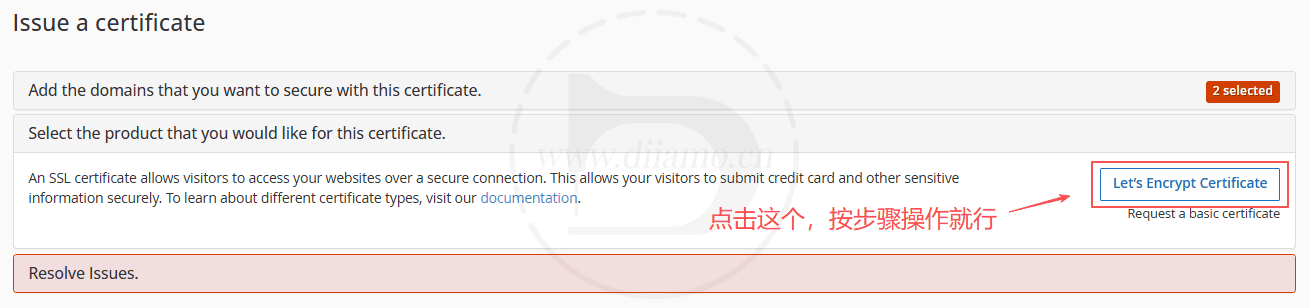
Click the “Let’s Encrypt Certificate” button↓ and follow the steps.
Once the installation is successful, a green lock ↓ will appear. If only xxx.com and www.xxx.com安装成功 are successfully installed, it’s okay if the others aren’t—it won’t affect normal access to the website.
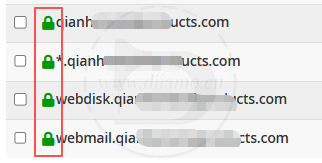
If the installation keeps failing, contact the host's online customer service and let them handle it.
Note: If you’re using the Cloudflare CDN, automatic renewal of Let’s Encrypt SSL certificates may sometimes fail. In that case, temporarily disable the orange cloud icons next to the two A records for your domain in Cloudflare, then manually renew the SSL certificate in the interface shown above. After the renewal is successful, be sure to manually re-enable the orange cloud icons next to the two A records for the domain in Cloudflare so that the CDN can function properly. The most reliable method is to install the Cloudflare SSL certificate using the steps below.
Installing CloudFlare/Custom SSL Certificate
ChemiCloud hosting supports the installation of third-party, CloudFlare, and custom SSL certificates. Click the image below to proceed “Installation” section. Click the “Update/Install Certificate” button in the red box.
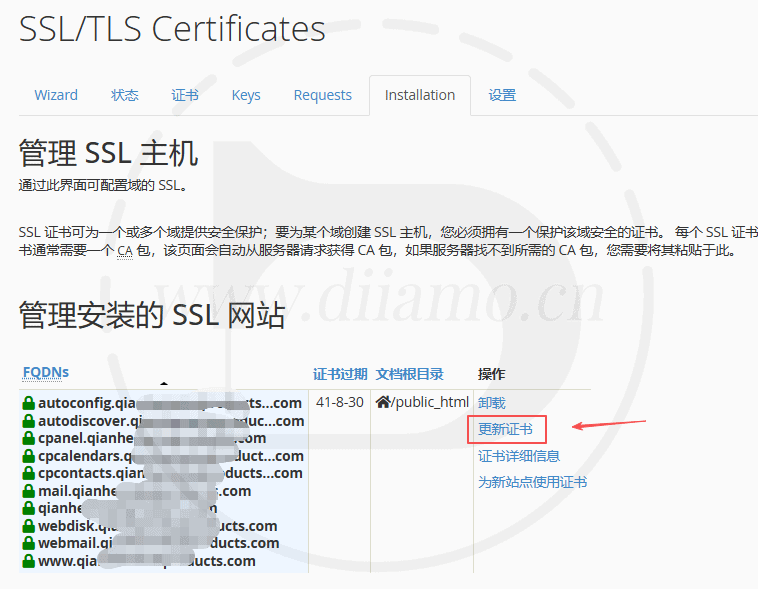
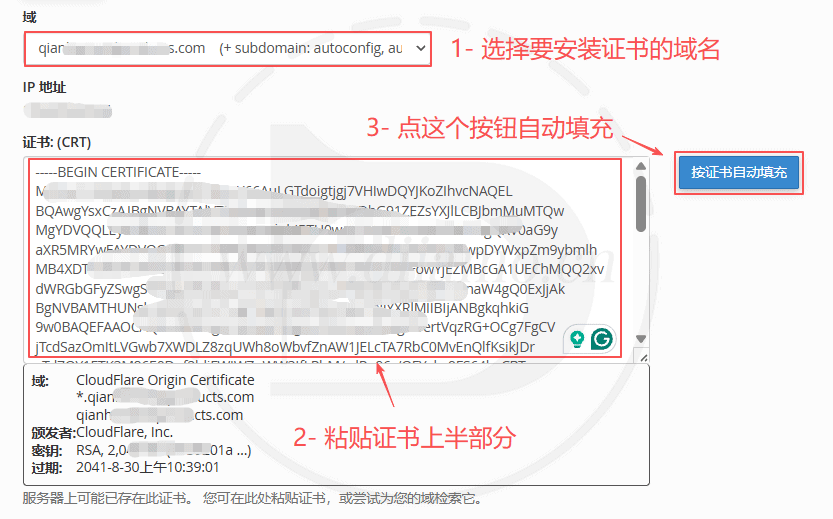
Once you reach the screen shown below, 1) First, select the domain name where you want to install the certificate; 2) Paste the “-----BEGIN CERTIFICATE-----” portion of the certificate; ignore the “-----BEGIN PRIVATE KEY-----” section for now; 3- After pasting, a “Autofill Based on Certificate”Button—clicking it will automatically fill in the remaining certificate information."
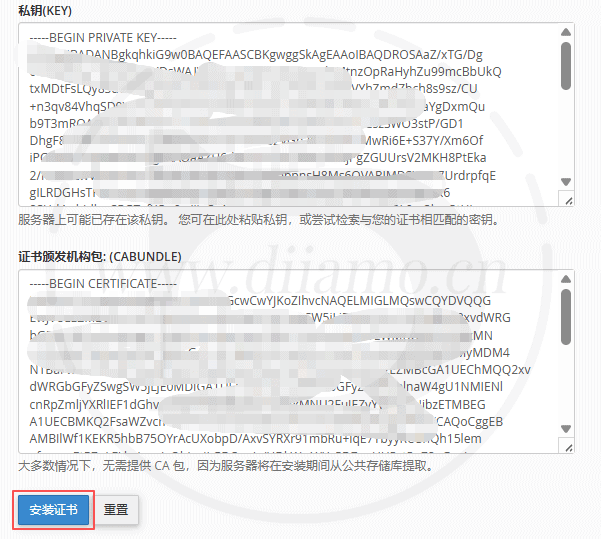
Note: I’ve personally tested this: if you click “Autofill” for a Cloudflare certificate, it will fill in successfully. If other custom SSL certificates do not fill in correctly, paste the remaining certificate content into the corresponding fields shown in the image below. If there is no appropriate content to paste into the “Certificate Authority Bundle: (CABUNDLE)” field, simply leave it blank.
The two remaining certificate fields in the image below have already been automatically filled in with certificate information↓. Click “Install the Certificate”Click the “” button to complete the certificate installation.
Once the installation is successful, a green lock ↓ will appear. If only xxx.com and www.xxx.com安装成功 are successfully installed, it’s okay if the others aren’t—it won’t affect normal access to the website.
If the installation keeps failing, contact the host's online customer service and let them handle it.
ChemiCloud WordPress Hosting Usage/Optimization Tutorials
Note: Below are screenshots and tutorials for the ChemiCloud WordPress hosting interface. If you have a Managed hosting plan, please scroll down toManaged Hosting Tutorial.
After reading the tutorial below, you'll understand how to use this server and how to optimize it. If you have any questions, please leave a comment below.
Let hosting customer service relocate websites, mailboxes
Tip: Just follow the steps below and ask your hosting provider’s customer service to migrate your website for you—there’s no need to do anything else first. Once the website has been migrated, you can update your domain name records to point to the new host (see the tutorial above) and then install the SSL certificate.
If you need to migrate your website to ChemiCloud hosting, log in and go toHere is the link to the ChemiCloud support ticket page,Fill out the work order, fill out the information and settings as required, and customer service will help you relocate your website and email to the new server within 24 hours.
If you are using a SiteGround server with Secure Login Authentication (2FA) set, it is recommended that you first set help@chemicloud.com toCollaborator (click to see tutorial)...which saves you the time it would take to reply to an email. You can only designate one collaborator per website. If you need to migrate multiple websites, simply designate a collaborator for each one; just make sure to use the same name and email address for all collaborators.
If you use email accounts provided by hosting providers such as SiteGround or Hostinger, your email service will be suspended if you do not renew your hosting plan, and you will need to switch providers. In the support ticket form, select the option to migrate your email accounts to the new server (see image below), and be sure to include all email addresses and their corresponding passwords in the ticket.

Below is an example of how to fill out a migration ticket. Follow the instructions shown in the image. If you're using a control panel like Baota, simply replace the old server login credentials shown in the image below with your WordPress site's admin login credentials.


The following is how to fill in Message, Subject is the subject of the work order, just enter Migration, Message is the content of the work order, just enter the following content.

Below is the content of the support ticket we created, for your reference only. In the parentheses after “website,” enter the URLs of the websites to be migrated; if there are multiple URLs, simply separate them with commas. If you do not need to migrate email accounts, remove “AND EMAILS” from the second line.
Line 3 instructs you to import the migrated website into WP Toolkit for easy viewing and management. Line 4 instructs you to install and configure the Redis object caching feature of the Litespeed Cache plugin and increase the OPcache memory to 512 MB. This takes care of everything in one go, eliminating the need for additional support tickets later on.
Hi,
Please help me migrate my website(xx.com, abc.com) AND EMAILS to ChemiCloud.
Remember also help me importe site to WP Toolkit.
Also, pls help me install and set up redis object cache function in Litespeed cache plugin, and increase Opcache memory to 512.
If you need any other information, please let me know.
Thank you very much.
If you need to relocate your mailboxes, you need to write all the mailbox accounts and passwords together in the above work order content, and provide the mailbox IMAP address (get it from the mailbox/old host customer service).
After relocating the website, remember to modify the domain name resolution A record or DNS resolution binding ChemiCloud hosting, and at the same time, install the SSL certificate in the background, as well as set up the website (see the Management, Optimize Website Settings section below), and then clear all caches.
Be sure to check that all website features are working properly and that any genuine plugins and themes remain activated. If your old website used the LiteSpeed Cache plugin, be sure to update the IP address associated with the plugin after the migration.
If you have any questions, just ask the hosting support team—they're more knowledgeable, and you can start chatting with them in just a few seconds. If the hosting support team can't resolve the issue, contact Diiamo's WeChat customer service for assistance.
Familiar with WordPress hosting backend, features
Server backend login address. https://chemicloud.com/loginThe default screen after logging in is the Dashboard/Dashboard screen shown below. Mo I added notes to make it clear at a glance.

WordPress Hosting into Cpanel
The server and the website are basically all operated in Cpanel, in the Dashboard/Dashboard below the orange symbol, enter Cpanel. from here to Cpanel without logging in, it is recommended to enter from here in the future.

WordPress Hosting Installation/Building WordPress Website
After creating the server, you need to install/build the website. First, follow the steps above to enter Cpanel, the first time you enter the new server will pop up the following interface by default ↓, click the red box to install WordPress.

If the above installation box doesn't pop up, click on "WordPress Manage Team" in the image below to enter the WordPress management interface.

Click on "Install WordPress" and follow the steps.

Select the website prefix https:// or https://www. (Be sure to choose an address that starts with “https,” regardless of whether you have an SSL certificate.) Then select a domain name. The “/In Directory” field refers to the installation location; for your first website, we recommend leaving this field blank and not entering anything.

Fill in the information as shown in the image below ↓. Any settings not mentioned will be saved as defaults. Click the “Install” button at the bottom of the page to begin the installation.

Installation in progress↓ is displayed.

Once the installation is complete, the admin URL will be displayed. Click the blue button below to access the website management panel.

Web site management ↓. So far Wp has been installed, if your domain name has been resolved in accordance with the above tutorial binding number server, then click on the blue "login" button in the following figure can log in the background of the site.
Or use https://www.diiamo.cn/wp-admin web site to log in to the background (yellow background URL changed to your URL), login account and password is just set.
If you have other hosts tied to your primary domain, you can also enable a temporary domain (tutorial below) and then add the /wp-admin Log in to the WP backend.

WordPress hosting access to website frontend and backend via temporary domain name
Often, domain names don’t resolve immediately. When migrating a website or performing other tasks that require accessing the website’s admin panel on the new server, you can use a temporary domain to access it.
Go to Cpanel, find and click "Website Preview" in the "Domains" section.
Note: Temporary domain name is valid for 24~48 hours, after expiration, you can re-create a new temporary domain name.

Click the "create" button next to the domain name to create a temporary domain name. After successful creation, the Open button will be displayed, click on it to access the frontend of the website.


First display some terms of the temporary link, click Yes button to jump to the front of the site. The URL in the address bar of your browser is the temporary domain name, after the domain name add /wp-admin Suffixes can be logged into the backend, e.g. https://xxx.skipdns.link/wp-admin.

Login and password below “WordPress Hosting Setting Login Username and Password” section to view and modify login information.
Xiaodi once used a temporary domain name encountered a problem, many pages can not be opened, prompting the prohibition of access. This situation is certainly the first time to find the host customer service.

How to Contact Host Online Customer Service
The orange round button at the bottom right corner of the page is the online customer service, click on it and it will expand, just type something and click on the button to start chatting, the customer service will reply in 1 second. If you encounter any problems, just call the customer service.
The online customer service button is only available in theparticular pageThe online customer service button appears in the lower right corner. Many pages do not display the online customer service button. Please enterinstrument panelsand other pagesContact hosting customer service.


WordPress hosting open, set up enterprise mailboxes
Enter Cpanel and find the corresponding function in the "Email" section. Contact online customer service to get the domain name resolution records (MX, SPF, DKIM, DAMRC) of your mailbox, and then add the resolution.

WordPress Hosting Change Cpanel Language to Chinese
After the installation, let's change the language of Cpanel. If you think the default English language is OK, you don't need to change it, just skip this step.
In the steps above, tap the Cpanel icon at the top ↓ to enter Cpanel. or tap the Cpanel icon in the Dashboard dashboard to enter, which is illustrated with a tutorial and screenshots.

Click on your avatar in the upper right corner and click on "Change Language".

Select the target language, e.g. Chinese, and click the "Change" button.

After changing the language click on the red box Tool in the picture below to return to Cpanel.

WordPress Hosting View Resource Usage
After logging into cPanel, resource usage will be displayed on the right side ↓. You can see it comes with 6GB of RAM, which is very generous. Servers like SG typically only offer around 3GB of RAM at their highest tier.


WordPress Hosting Change PHP Version
The default PHP version is 8.0. We recommend changing it to 8.3, as it currently offers the best combination of performance and compatibility, and is faster. In the “Software” section, locate and click “Select PHP Version.”

In the picture below, select PHP 8.3 and click “Apply”.8.3 offers better performance and good compatibility; Xiao Di has used it on multiple websites without any issues. If a website has compatibility issues, switch back to 8.1, which offers even better compatibility.

ChemiCloud enables extensions like Memcached and Redis in this location as well, Redis is enabled by default. If you want to enable Memcached (not recommended), just check the box. It is recommended to only enableRedis, which works better with LiteSpeed.

Enable Mandatory HTTPS
Enforcing HTTPS access significantly enhances security and is a feature that must be enabled when building a website. Log in to cPanel, and in the section shown in the image below, click “Domains” (highlighted in the red box).
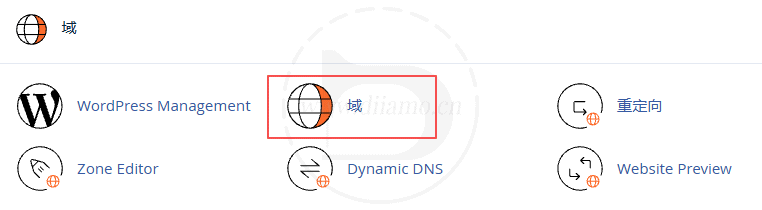
Click the red box in the image below to enable it. The image below shows what it looks like after it’s enabled.

Adjusting Opcache Memory
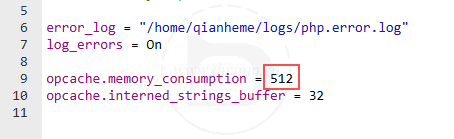
The default Opcache memory limit for WordPress hosting is 128MB, which is barely enough for one website; it’s insufficient for two or more websites, so it’s best to increase it slightly.
In cPanel > File Manager > public_html, locate the php.ini file and right-click it, then select “Edit.”
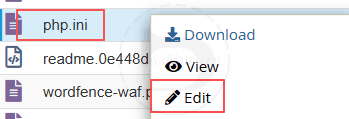
Just click “Edit.”
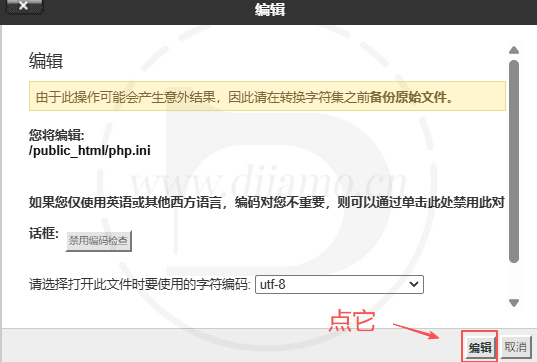
In the area highlighted in red, change the value to 512 (the maximum supported value is 512), then click “Save Changes” in the upper-right corner.
After making the changes, you'll need to wait a few hours for them to take effect. If they haven't taken effect after a long time, contact your hosting provider's online customer service for assistance.

WordPress Hosting Enters WP Toolkit to Manage, Optimize Site Settings
Click on the top left corner of Cpanel (red box below) to go to WP Toolkit. this is where you manage and setup your WordPress site.

1- First, enable the "takeover of wp-cron.php" function. We've done this in theUltimate WordPress Speed Optimization TutorialAs explained in the article, using server cron instead can greatly reduce the burden on the server while guaranteeing the page loading speed.

2- Turn on the "Search Engine Indexing" feature in the image below so that your website can be indexed by Google and other indexes and participate in the rankings. If you turn it off, it will not be included. Even if your site is not yet ready, do not want to be included also need to open this function, because I am afraid that you subsequently forget not know why the site can not be indexed.

If you don't want to be indexed in the website construction, you can enable the following function in the WP background "Settings" > "Reading", and you won't be indexed by search engines. You can also enable the following function in Rank Math etc. SEO plugins set Noindex not to index, so there's no need to turn off the above feature.

3- Click “One Problem” at the top, then select “Redirect to HTTPS is disabled” from the dropdown menu. When the text appears, click the blue text “Enable redirect to HTTPS.”

Click the blue text “Open Redirect to HTTPS”↓ to automatically enter Cpanel > Domain. Some users have reported that the blue text sometimes doesn't appear; you can also access it manually.

After jumping to the interface below, just click the button to enable it. This will redirect http URL access to https, enhance security and SEO effect.
Only the first added website has this enable button. The second website does not have an enable button initially and is automatically enabled by default (no configuration required).

The following pop-up will appear in the upper right corner when enabled.

4- Then click "Check Security" as shown above, and enter the following interface. Except the red box in the picture below, check all the other boxes, and then click the blue "Security" button in the upper left corner to apply the security settings.
Clicking on the blue "Security" button below will enable the selected security settings.

The security measures above are all very practical and we have added these precautions to our own Vultr server firewall. Security is one of the benefits of ChemiCloud and we can manually disable these features.
WordPress Hosting Setting Login Username and Password
In Cpanel click on the content in the upper left corner of the image below to go to Site Management.
The blue "Login" button below is for logging into the WordPress backend, and "Settings" is for setting your login username and password.

After clicking “Settings” on the above picture, the following picture will pop up on the left side, you can view and change your login password, administrator email, etc.

How to Add a Second Website with WordPress Hosting
The first step is to add a domain name, as you will need to select/bind a domain name when you create your website. Go to Cpanel and in the "Domains" section, locate and click on the "Domains" in the red box in the image below.

Click on "Create A New Doamin" ↓.

Enter the domain name and uncheck ↓.

After unchecking the checkbox in the above picture, it will become the following interface, click "Submit" directly. "Subdomain" is to set the URL structure of Cpanel, it has nothing to do with the website, don't worry about it, just default it.

Wait for a while, after adding a domain name to complete the return to the domain name list interface, will show the newly added domain name ↓. You need to add domain name resolution binding server, IP address view method and resolution method, please refer toon top ofTutorial. It is also possible to access the site first through a temporary domain (the following(tutorials are available), parse them later.

Next add the new site, in Cpanel, scroll down the page to the very bottom and click on WordPress below.

Tap Install Now↓.

Select the website prefix https:// (with or without SSL certificate), and then select the domain name. After the folder / In Directory is the meaning of the installation location, just leave it blank.

Fill in the information as shown below ↓.
Finally tap the "Install" button at the bottom of the page ↓.

Installation in progress↓ is displayed.
Waiting for the installation to complete will display the backend address. Click on the blue button below to enter the site administration.
Site Administration ↓.
How does WordPress hosting get into file management? Edit wp-config.php?
Go to Cpanel, find and click on "File Manager" in the "Files" section.


Or In Cpanel click on the content in the upper left corner of the image below to go to Site Management.
Click on "File Manager" in the image below to enter File Management.

How WordPress Hosting Automatically Backups, Restores Websites
In Cpanel, "File" section, find and click on "JetBackup 5".

Click the first "Full Backups" to view the backup and restore data.

Click to select the backed up data and the 3 function buttons below will turn orange. You can restore the website, download and delete the backup data.

ChemiCloud Managed (Hosting) Hosting Tutorials
Tip: Below is a tutorial on how to use ChemiCloud Managed hosting, for shared WordPress hosting, scroll up to theWordPress Hosting Tutorial.
How Managed Hosting Creates Websites/Instances
After signing up, there is only an empty host and you need to create a website/Instance before you can use WordPress.
Enterinstrument panelsClick on the WordPress gray logo on the right side of the host (red box below).

If Instances already exist (the system automatically creates them), the red box below will be displayed, so there is no need to create new ones.Ignore the following steps.
If your package supports 3 or more websites, you can add more Instances (an Instance is a website). To add a second instance, click on the orange "Add New" button in the upper right corner of the image below and follow the steps below.

If you don't have any Instances, you will be taken to the following screen, click "Create First Instance". If you want to create a second Instance, follow the tutorial below.

Select the ↓ on the left and click the "Continue" button.

Select a theme ↓ and choose as desired. If you don't know what theme to choose, it is recommended to choose the first WP default official (named after the current year) theme and click "Use This Theme".

Enter the URL↓ and click the button below. Note the URL format:https://www.diiamo.cn, add www if you want to, don't add it if you don't.

Next, enter the website name ↓ and tap the button below. It is generally recommended to write the name in the form of xxx.com for easy recognition.

It may take 5~20 minutes. Please be patient.refrain fromRefresh/close the page!!!
If you haven't created it in 20 minutes, you may be experiencing problems, send the textual content below directly to on-line customer service and let them create it for you in a few minutes. Be sure to put the following text content https://xxx.com Change to your website URL! Add or not add www at your own discretion, we usually don't add it to make it look short.
Hi, I am failed to creat new instance, it already took me 30 minutes. Please help me creat a new instance, domain: https://xxx.com.
Thank you very much.
If it is created successfully, it will show a green interface with 2 buttons at the bottom, click the "View Site Details" button to enter the website management background. If the customer service help you to create, you can also enter theinstrument panelsClick on the red box button below to enter the site administration backend.

The orange button below is to enter the website management background (not WP background), used to manage all aspects of the site, click first, to bind the domain name to use to access the site.
The blue button is to go to the WP backend and build your website. Because there is no bound domain name, so click to visit is not your website, please ignore, ignore it. First follow the tutorial below to resolve the domain name first for subsequent operations.

Hosted server: Resolve the domain name and bind it to the server; view the server's IP address
Next, resolve the domain name and bind the hosting so that you can access the website through the domain name, log in to the WP backend to build the website and so on.
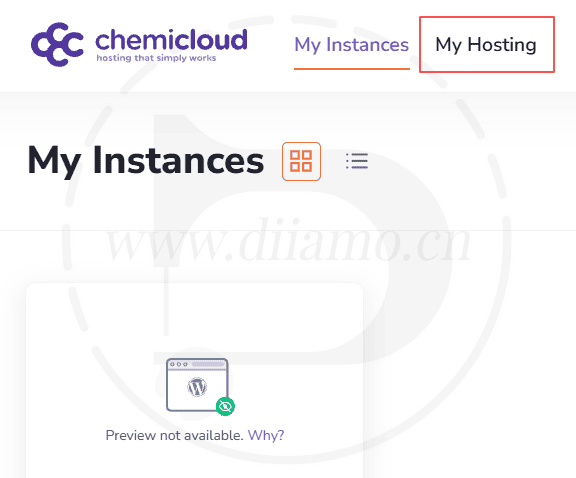
Enterinstrument panels, Click the button in the red box below to access the website's admin panel.
Click on "My Hosting" in the image below.
There are two ways to bind a domain name to a web host; we recommend usingMethod 1Link—it's simpler and more convenient.
Method 1: Add an A record for your domain pointing to the server’s IP address. This method allows you to keep your existing DNS servers and continue using your own domain’s DNS settings, which is more convenient. We recommend using this method.
There is no place in the admin panel to view IP addresses....you'll need to contact ChemiCloud hosting support to obtain the server IP.In My Dashboard There's a large orange button in the lower-right corner of the page. Click it to chat with the hosting provider's customer service team—you'll get a response within seconds.
Send this directly to the hosting provider's customer service: Can you please tell me my MWH server IP address? I need to point my domain to this server.
Actually, you can also create a WordPress site using your host’s temporary domain (as shown in the previous tutorial), install the LiteSpeed Cache plugin, and view your host’s IP address within the plugin.
Method 2: Modify the Domain's Nameservers (NS Servers)... Simply change it to the two records shown in the orange box in the image below (these may vary by website). From now on, all DNS record updates for your domains should be added or modified through your hosting provider; changes made at the original domain registrar will not take effect.
If you don't know how to make changes, ask the person who set up or maintains your website, or a tech-savvy colleague. You can also find instructions by searching on Baidu.
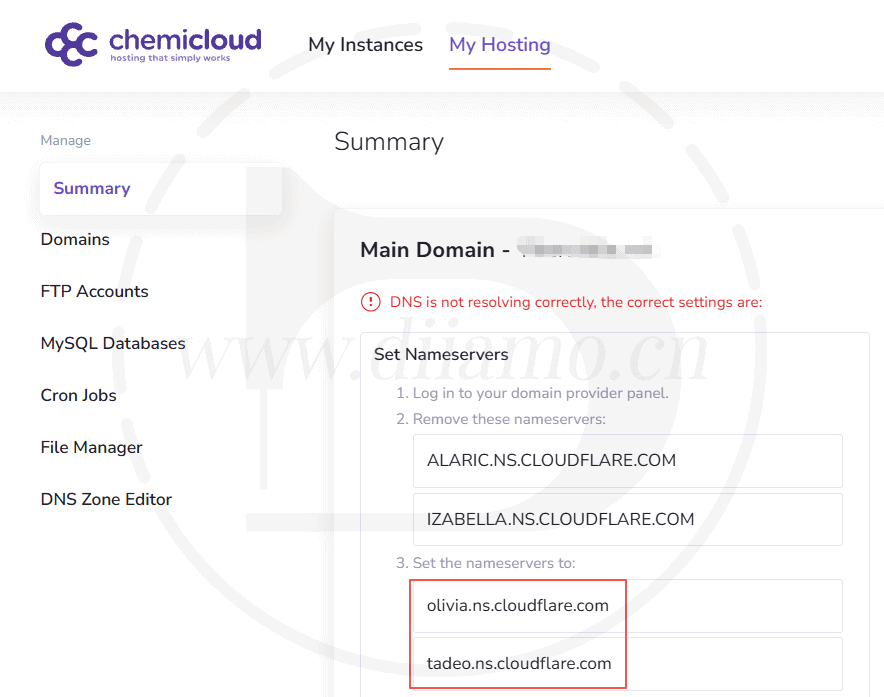
Bind the hosting in this way, and later adjust the domain name resolution in the following interface.

After modification, you need to wait for the parsing to take effect. If it is fast, it will take a few minutes, if it is slow, it will take a few minutes. After it takes effect, the following picture will be displayed ↓. Next, install the SSL certificate, some settings, according to the following tutorial operation.

Familiar with hosting hosting background interface, function
A brief introduction to the host's website management interface and features to facilitate subsequent management and maintenance of the site.

Hosting Hosting My Hosting interface and features introduction
Below is the My Hosting interface and features description, in which you can modify the website domain name, create FTP accounts, manage databases, create hosting level scheduled tasks, manage website files, and modify domain name resolution.

Free SSL Certificate Installation for Managed Hosting
Enter firstMy Instances list pageClick on "Manage Site" of the corresponding website to enter the site management.

Click on the "Advanced" section. Click on the button next to "SSL Certificate Applied" to install an SSL certificate, just follow the steps, we recommend that you install the one containing the words "Let's Encrypt".
Remember to turn on the "Force HTTPS Redirect" feature after installation, this will force the use of HTTPS URLs and is very important.


Managed hosting view/change WordPress website login, password
There is no step to enter an account password when creating an Instance/Website, the system automatically generates a login and password. Follow the tutorial directly above.Go to the "Advanced" section, and inside "Users" is the website account information. Click on the white pencil icon in the red box to change your login name and password.
The default backend login is https://xxx.com/wp-admin, orhttps://xxx.com/wp-login.php, remember to change the gray URL to yours.

Below is the interface to change your login information, follow the text prompts to change it. The default login name and display name is admin, which is very insecure and must be changed! The display name should be short, usually your company's brand name or company name.

Managed Hosting Tweaks PHP Version, Settings and Parameters
Also in the “Advanced” section, go to “Developer Settings”, in which you can switch PHP versions, set parameters, etc.. It is recommended to choose PHP8.3 version, better compatibility.

The following image shows the contents of PHP Settings

Managed hosts edit wp-config.php
Also in the "Advanced" section, go to "System Configuration" and add and modify wp-config.php here.

Managed Host View Operation Log
Also in the "Advanced" section, go to "Logs", check Instance operation logs, WP website error logs, PHP logs and host logs here. It's very convenient to check the logs to find out the cause of website problems.

Managed Hosting View Database Accounts and Passwords
Also in the "Advanced" section, go to "Instance Details", the red box below is the MySQL database account and password.

Managed Hosting Modify Domain Name Resolution
If your domain name is bound to the host through our recommended, modified NS method, then the host's domain name resolution service is used.
Click to go to the image belowDomain name resolution management interfaceThe domain name resolution can be deleted, modified, and added here. Functionality at a glance, but not more resolution.
LiteSpeed Cache Plugin (LSC) Settings
ChemiCloud is a LiteSpeed server.can only be used LiteSpeed Cache caching plug-in (referred to as LSC) ↓, can not use other caching plug-ins. LiteSpeed Cache is very powerful, full-featured, rest assured that the use.

Although it's powerful, the configuration is complicated, and if you make a mistake, your website will encounter problems. We recommend checkingOfficial setup tutorial ↓, or Google it and follow the steps.

If your website malfunctions after enabling this plugin, simply disable the JS and CSS optimization features. If you’re using Cloudflare as your CDN, be sure to link it in the “CDN” section > “Cloudflare” of the LCP Caching plugin.
How to Enable Redis Object Caching in LiteSpeed
There are two ways to implement Redis object caching. The first method is to install and use Free Redis Object Cache PluginAnother method is to use the Redis object caching feature built into the LiteSpeed Cache plugin.
ChemiCloud hosting support recommends using the first method, which is the easiest to set up and the most effective—it’s particularly well-suited for large websites and e-commerce sites, so we recommend it. For B2B sites, blogs, and other static websites, the second method is more suitable, as it’s easier to maintain.
Method 1: Use the free Redis Object Cache plugin
Note: You must first disable all other caching plugins before following the steps below; otherwise, activation may fail.
please followOfficial Redis Object Cache Enablement Guide, follow the steps to enable it. Simply put, go to the “Software” section in cPanel, find and click “AccelerateWP,” then click the image belowOn the rightThe gear icon in the red box. Don't click the one on the left! That's for installing the cache plugin.
Note: Only WordPress hosting supports this installation method. If you’re using a managed hosting service, contact your hosting provider’s support team directly to install and activate Redis Object Cache Pro. If their support team is unwilling to do so, contact me and I’ll provide you with a GPL version.

Click to enable ↓. Note: You must first disable the object caching feature in the LiteSpeed Cache plugin before enabling this: Go to “Caching Rules” > “Objects,” click the “Disable” button next to “Object Caching,” and then save.

Automatically installing the plugin↓.

Plugin installation complete / Redis cache successfully enabled↓.

Go back to the website’s admin panel, click the “Redis” menu under “Settings” to open the plugin interface shown below. Redis has already been automatically configured and enabled↓—it’s that simple.
Remember to disable the object caching feature in the LiteSpeed Cache plugin, because this feature can only be enabled in one plugin at a time: Go to “Caching Rules” > “Objects,” click the “Off” button next to “Object Caching,” and then save your changes.
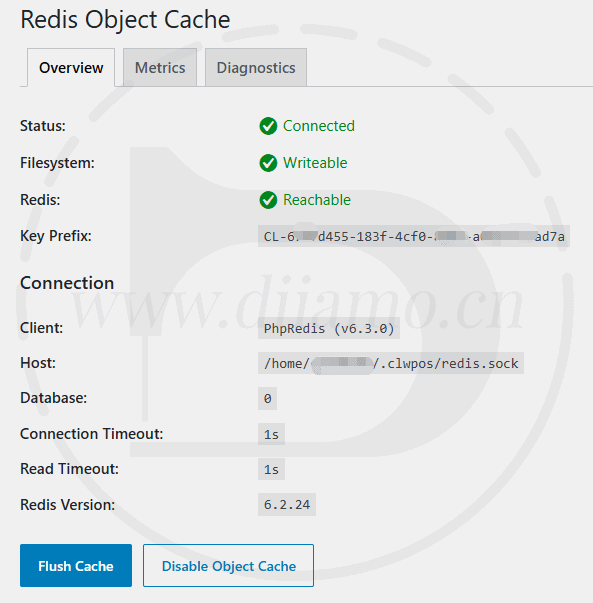
For even better results, install ourObject Cache Pro plugin. If you purchased hosting through our referral link, simply contact our WeChat customer service to receive this plugin for free.
Method 2: Enable Redis object caching in the LiteSpeed Cache plugin
Check out this official articleTutorial on How to Enable RedisJust follow the steps, and I'll briefly explain the method below.
Simply put, follow the steps above. After enabling the Redis cache, click the “Redis” menu under “Settings” to open the screen shown in the image above, and make a note of the Host: path listed there. /home/xxxx/.clwpos/redis.sock, then enter it in the “Host” field under the “Objects” section in LiteSpeed Cache and save it. Next, uninstall the Object Cache plugin you installed in the previous steps.
Tip: Actually, the "Host: path" format is generally the same /home/xxxx/.clwpos/redis.sock...Replacing "xxxx" with the first 8 letters of the URL you entered when creating your website should work just fine. Give it a try—it'll save you the trouble of going through the steps above.
You can find the host path in the settings of the Object Cache plugin (which you can enable there) as well as in the wp-config.php file. Enter it into the object cache settings of the LiteSpeed Cache plugin (see the tutorial below), then save your changes. Remember to deactivate the Object Cache plugin once you’re done.

If you still don't understand, or if you're just too lazy, you can simply send the text below (replacing xxx.com with your URL) to the hosting provider's online customer service and ask them toEnables and links the Redis cache for you, the service is that good!
Hi, my site:xxx.com, can you pls help me connect/activate the Redis in LiteSpeed Cache plugin? Thank you.All ChemiCloud servers run LiteSpeed, so you can only use the LiteSpeed Cache plugin. This cache plugin includes built-in object caching functionality, which we recommend enabling as it is extremely helpful.
Enter the Host path (the path with the black background that you saved in the previous step) as shown in the figure below, enter 0 for Port, and enter 0 for Redis Database ID as well. If this is a second website on the same server,Enter 1 for the Redis Database ID, 2 for the third site, and so on, otherwise the site will be abnormal.
Finally, click Save, under normal circumstances Connection Test: will show Passed, which means enabling Redis object caching is successful. The following path is different from the one above because the screenshot is from another client's website, so ignore it.

For the Redis Database ID, enter 0 for the first site and 0 for the second site.Enter 1, the third site enter 2, and so on.

If your website is on the larger side and contains a lot of dynamic data (e.g., an e-commerce site), we recommend switching toObject Cache Pro plugin, , ,more effectiveThe LSC plugin has a lot more features and finer control. Simple small sites continue to use the LSC plug-in object caching function on the line.
How is the LiteSpeed Cache caching plugin Crawler crawler feature enabled?
The Crawler/crawler function is, in fact, thePre-cachingFunction. The crawler will traverse the site to generate a cache for content that has not been generated or the cache has expired. The advantage is to try to make all the content in the state of being cached, visitors visit the direct provision of cache without having to go back to the source, fast loading speed, the server pressure is small.
Crawler/crawling feature will take up a lot of resources and lead to website lagging, almost all hosting provider's LiteSpeed web servers disable this feature by default, only the hosting provider has the permission to enable it.ChemiCloud doesn't allow Wordpress hosts to enable this feature, and Managed (hosted) hosts can enable it.
Without this feature, pages will not be cached normally, they need to be crawled by visitors or crawlers on the front end to generate a cache. Submitting to Google for inclusion, etc., or developing a site for AI will help more pages to be cached in a timely manner.

You can use third-party plug-ins or Cron scheduled tasks to achieve pre-caching, please move to Google search for detailed methods.
LiteSpeed Cache Caching Plugin CDN Instructions for Use
ChemiCloud WordPress hosting (hosting under $10 a month) has a CDN setting inside the LiteSpeed Cache caching plugin that uses the free QUIC.Cloud CDN Complimentary Packages, with only 6 nodes (US3+EU3) and no firewall, it's pretty cockamamie.
To use and configure this free CDN, refer to theChemiCloud Official Tutorial.
Diiamo suggests not to use this free CDN, the results are mediocre and recommenduse (sth. different)CloudFlare CDNFree packages instead for better results have more than 200 nodes with firewalls and other features, known as Cyberbuddhas.
To disable QUIC.Cloud CDN, disable it inside the LiteSpeed Cache caching plugin (below).

ChemiCloud's Managed Hosting↓, now不GiftPaid QUIC.cloud CDN for Enterprise Distinction...and we're also using the free CF CDN. The hosting provider's customer service said that QUIC.cloud CDN has a lot of issues and poor support and response times, so we're not using it.

CloudFlare CDN's APO feature not working
LiteSpeed Cache caching plugin is not compatible with CloudFlare APO function, you need to add other plugins to work, please move to Google search for details.
Upgrading server configurations, purchasing addons
Login Serverinstrument panelsAfter that, click on the red box gear icon below to enter the server details.

Scroll down to "Addons and Extras", choose what you want, and click the orange button on the right to purchase.Click to viewExtended Details and Pricing.
"Turbo + Boost" is for upgraded configuration, "Additional Disk Space" is for increased hard disk space, "Dedicated IPv4 address "Dedicated IPv4 address" is a separate IPv4 address. The price didn't give a discount, Mo thought it was too expensive.

ChemiCloud Common Problems & Solutions
Below are some common problems that Little D has encountered or received feedback on, as well as solutions. If you have any other questions, please feel free to leave them in the comments below. If the purchase was made through our referral link, please feel free to contact WeChat customer service for advice.
Imunify 360 automatically disables GPL version of Elementor Pro plugin
If the site usesGPL version of Elementor ProBuild, suddenly some front-end boards are missing, go look at the backend to see if the Elementor Pro plugin is disabled or removed.
server-containedImunify 360Antivirus software marks the GPL version of Elementor Pro as “backdoor”, “toxic”, and then automatically disables the plugin↓. This is because they feel that the GPL version of Elementor Pro has aa safety hazard, would rather kill than let go.

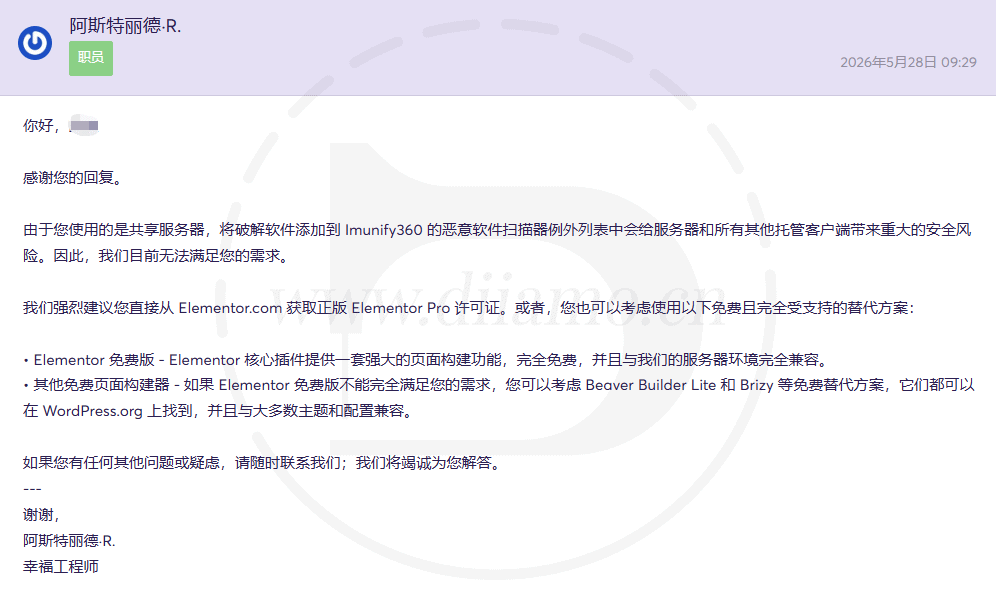
Xiaodi opened a work order with ChemiCloud official chatted about this issue ↓, hosting merchants are not willing to add the Elementor Pro corresponding files to the firewall whitelist in view of security issues.
The only way is to buyGenuine Elementor ProDiarmo has to offer.Genuine Elementor Pro Activation ServiceWe offer a free activation for 1 year if you buy the hosting through our invitation link. If you buy hosting through our invitation link, you will get 1 year activation for free and half price ($35/year) activation of the same hosting site from the second year onwards.
Updated June 12, 2026: ChemiCloud has officially switched to using the free version of CloudFlare CDN,不Free QUIC.cloud CDN.
How to setup and enable QUIC.cloud CDN?
ChemiCloud WordPress hosting is a shared hosting service with lower pricing, and the provider does not include QUIC.cloud CDN. We recommend using the free Cloudflare CDN, which performs very well. For specific setup instructions, please refer to Google search results.
ChemiCloud Managed Hosting includes complimentary enterprise-grade paid services. QUIC.cloud CDN—this CDN is amazing, even outperforming the paid version of Cloudflare CDN. You absolutely must use it!
This CDN is auto-enabled and auto-configured, so there is no need for us to do anything, this CDN is working when you install Wordpress. Cache exclusion rules, pre-caching and so on are preset, don't worry, it works perfectly.
This QUIC.cloud CDN we can't modify the configuration and there is no corresponding interface to control it, only the hosting merchant has the authority to set it up. If you have any questions or needs about CDN, just contact the hosting customer service to deal with it.
Only in the CDN interface of the LiteSpeed Cache caching plugin ↓, you can see theSome information about this QUIC.cloud CDN.

To see whether the CDN is effective, the front-end press F12 to open the browser developer tools, click on the "Documentation" section, click on a random resource, check the "response header" of the X-QC-Cache value, if it shows hit that the name of the CDN cache, CDN is working normally.
The first page load may display "Miss" or similar. Refresh the page a few times and check again; if it changes to "Hit," it indicates the CDN is functioning properly.

Online tools are also available https://check.lscache.io/ To test whether the CDN cache is working properly, this method is more convenient and intuitive. After entering the tool, enter the URL and click the "CHECK" button.

The red box below indicates that the CDN is working properly.

Can't find online customer service, doesn't show customer service
The online customer service button is only available in theparticular pageThe big orange button is the one that appears in the bottom right corner of the page. Many pages do not show the online customer service button, so please go to theinstrument panelsand other pagesContact hosting customer service.
How to Enable Redis Object Caching
The aboveHow to Enable Redis Object Caching in LiteSpeedThe first method is recommended.
How to Enable the Free AccelerateWP Caching Plugin
AccelerateWP is a free caching plugin included with WordPress shared hosting (not available on managed hosting, and unnecessary there). It's essentially a clone of Wp Rocket, with identical functionality and interface. The only difference is the absence of the “Combine Critical CSS” feature.
It is not recommended to use this plugin, because the LiteSpeed system, it is recommended that it is best to use the LiteSpeed Cache caching plugin, the effect and speed is better, but also CSS and JS optimization features.
If you must enable AccelerateWP, you might as well install ourGPL version of Wp RocketThe "Generate Key CSS Functions" is much better. But AccelerateWP can be updated online, our GPL version of Wp Rocket has to upload the installer to update.
If you must enable AccelerateWP, find and click on "AccelerateWP" in the Cpanel "Software" section, then click on the red box gear icon below.
Note: Click the gear icon on the left to enable the cache plugin; the gear icon on the right enables the object caching feature (as discussed in the previous section).

Just click the red box in the picture below to enable it, it will automatically install and activate the AccelerateWP plugin in the background of your website. Note: You need to disable all other caching plug-ins before you can install this plug-in, and you can't use it together with other caching plug-ins.

Successfully installed SSL certificate, the site still says it is not secure.
One of the advantages of ChemiCloud server is that the customer service is very good, second reply, and will help you deal with it even if it's not a server problem. If you have a problem, just contact customer service directly to deal with it, you don't have to mess around with it yourself.
Below, Diiamo asked ChemiCloud customer service to help him check a website for SSL issues, and he said the SSL certificate was installed correctly and there was no problem.

I found that after closing the ladder software (scientific internet tool) opening the site loads normally and shows that there is an SSL certificate. After opening the ladder software and refreshing the page, it says that it is not secure and there is no SSL certificate installed. Looking at the error message in the picture below and analyzing it, it should be that the ladder is unstable or blocked or something like that.

Updated 2025.12.09: A client website using the Pagoda Panel encountered the same issue. This was caused by the browser's own cache. Switching to a different browser resolved the display problem. The issue will resolve itself once the cache automatically refreshes over time.
After adding a new site and moving multiple sites, only one site is shown in WP Toolkit.
Sometimes after adding a second website, or renting a new server and relocating multiple websites, only one website is shown in the WP Toolkit in the image below. You can update the data manually by clicking the "Scan" button in the red box in the image.

After the domain name binding server, the website sometimes can not open, but other people can open it!
A group member bought ChemiCloud hosting through Diiamo invitation link, feedback said that after resolving the domain name site can not open, but his colleagues and server customer service can open. Xiaodi used the tool to check the domain name resolution found that A resolution in some areas of detection failure, some areas show a different IP address (without the use of CDN), the domain name is registered in the Aliyun.


I suggested that he check the domain name resolution, a few minutes later he sent back the following picture to me, AliCloud background prompts "free version of DNS, no overseas resolution nodes, overseas access to the domain name DNS resolution is slow, high failure rate", cracked the case, it is this problem caused.

The solution is to modify the NS record to bind CloudFlare and use its domain name resolution service, or you can use its CDN service at the same time. OrChange to the server's domain name resolution service, just can no longer use the free CloudFlare CDN.
Dee, I'm in theLatest Namesilo Domain Name Registration TutorialAs mentioned in the article, it is best to register with NameSilo and other overseas platforms for foreign trade websites and cross-border e-commerce websites, as the resolution speed is fast, and the website access speed is faster, and these problems will not occur.
Suddenly the website could not be opened, prompting Host Error. received an email saying that the server was upgraded.
Diiamo himself uses ChemiCloud hosting and had a website that was suddenly inaccessible one day ↓.

The hosting customer service said they upgraded their servers to be faster and relocated my site to other machines, so the IP address changed. If the domain is using ChemiCloud's domain resolution service, they automatically update the IP resolution records.
Since I use Cloudflare, I had to manually update it myself. I didn't realize that they upgraded the server to change the IP address, so I didn't update the A resolution record to cause this issue.

I did receive an email informing me of this matter ↓, just did not mention that the IP will be replaced. in the future, I received an email from the hosting provider, prompted to upgrade the server, after upgrading, pay attention to go to see if the IP address has changed, and update the domain name A record resolution in a timely manner. Or take the initiative to ask customer service, this upgrade will change the IP address.

Update: I logged into Cpanle and found that there was no website under Wordpress Manager, and the data was not synchronized. Contacted hosting customer service to send screenshots to the other party to get, 5 seconds to get it.
Or you can click "Scan" in the WP Toolkit below to synchronize the data back to normal.
Managed Hosting Hosting Failed to Restore Backup Data
A recommended user reported that automatic backup data from Managed Hosting cannot be restored. Clicking the restore button triggers the error shown below. Hosting support responded that this occurs because backup data and website data are stored on separate servers (for disaster recovery security and performance). Therefore, users must manually download the backup and upload it to the website server for restoration. One-click automatic restoration is not supported.

Simply put, you can only contact the online hosting customer service to restore the data, tell them which date you want to restore the data that has been backed up, and the hosting customer service will restore it very quickly. Diiamo has already made suggestions with ChemiCloud to support allowing users to automatically restore backups with one click, wait for the follow-up.
Di recommends using both UpdraftPlus Premium Backing up website data to cloud storage via plugins is the most reliable approach. Server backup features have drawbacks: if you forget to renew your subscription, the server may be deleted. Additionally, server failures can occur due to fires or other incidents, leading to data loss.
UpdraftPlus Premium automatically backs up your data, allowing you to set backup schedules and data scope, and store backups to third-party cloud storage. You can view, restore, or delete backups directly from your website's admin panel, with one-click restore for added convenience.
Backup support major mainstream network disk, free registration Onedrive 5G capacity is enough for 1-2 sites. You can also go to Taobao to spend 30 yuan / year to buy 1T onedrive space, you can backup more than 100 sites.
Suddenly the website cannot be opened
If you encounter a website that suddenly fails to open, first visit the hostingNetwork Status pageCheck if the server is being maintained/upgraded or encountering any problems. For example, a user feedback website can not open display 522, I logged into its server and asked the hosting customer service, customer service said the server encountered network problems are being repaired.
I'm logged in.Network Status pageCheck it out, it is showing that it is in the process of being fixed. This hosting customer support is great, just contact the hosting customer support directly with any questions and you will get an answer in seconds and fix it right away. Much faster than contacting us directly at Diiamo.

The site is in maintenance mode
Sometimes batch update plug-ins, because of network lag and other reasons will lead to enter the following picture maintenance mode ↓, background and foreground can not be opened. This is the reason for WordPress, not the host of the problem.

Exit the maintenance mode method: Login to the hosting management background, enter Cpanel, find the upper left corner and click into the “WordPress Management”↓.

In the lower-right corner, locate “Maintenance mode” and click to enable it. Once successfully enabled, simply disable it again to restore normal access to both frontend and backend.

The backend is very slow, while the frontend is very fast.
A client's website using the Turbo package suddenly experienced severe backend lag, though the frontend remained responsive. After extensive troubleshooting, the issue remained unresolved. The hosting provider's support team, contacted multiple times, reported no detected problems and confirmed fast loading speeds.
Updated on December 24, 2025:It's a computer network problem, ladder software for a different line, or close the ladder and the speed returns to normal.
I had no choice but to contact the hosting provider's support again. This time, they provided the reason: some code in wp-config.php was placed below the line “/* That's all, stop editing! Happy publishing. */”, causing the error.
Manually added code must be placed above the line “/* That's all, stop editing! Happy publishing. */”, as shown in the image below!

Below is the detailed analysis provided by AI:
Changed hosting site speed or not?
Server card, the site speed must be slow, but the server fast does not mean that the site speed must be fast, because the speed is affected by many factors, the host is only one of them. According towooden barrel effect (e.g. of oil)How much water a barrel can hold is determined by the shortest plank.
ChemiCloud makes the hosting plank very long, but if some of the planks such as resource size, CDN, delayed loading of images, useless resources, DOM size, etc. are very short, the barrel still can't hold much water. If you want to have a qualitative leap in website speed.It needs to be fully optimized to make up for every shortcoming!
Suggest checking out what Diarmo wroteThe Ultimate WordPress Speed Optimization Tutorial, step by step comprehensive website speed optimization. Diiamo has WordPress website speed optimization service and Google SEO optimization service, please contact our customer service.

UPDATE: One user reported that switching to ChemiCloud shared hosting doesn't feel as good as CloudWays. ChemiCloud is priced at $3.5~$4.5/month and is benchmarked against SiteGround and Hostinger.CloudWays tens of dollars a month, please don't compare radishes to ginseng!
The main reason for a slow website is that it is poorly built, too bloated, and you don't know how to set up and optimize it, and the server can't run as fast as it should.Unless using high end hosting with CDN (auto-configured well)With resources provided from the cloud and faster TTFB, website speed is naturally faster!
High-end Hosting RecommendationsRocket HostFor $30 a month, you can use enterprise-level CloudFlare CDN + object caching for free, which optimizes Woocommerce in depth. You can buy the above mentioned ChemiCloud Managed Hosting hosting, buy a year price of $ 20.83 a month, acceleration effect is also very obvious.

Still think the price is high? Then you can only optimize as well as configure the free CDN yourself.Don't know how to optimize? Read more speed optimization tutorials on this site, step by step, if you do not understand, ask AI or Google search for answers.










5 thoughts on “超快ChemiCloud主机购买教程, LiteSpeed, 图文步骤+设置+优化”
Bought this hosting using a blogger link and it's been working really well for a while. I've been having trouble with siteground speeds before, but now the speed test scores on my phone are up!
牛逼,找了这么多资料,就你这是最全面的
啧啧啧,多点看我们文章,你会发现我们更多优点。
Good in-depth article, very rare
Thanks for the affirmation.